*
AIRCRAFT
SERIALS 15072004 THRU 15075781,
A15000227
THRU A1500523, F15000659 THRU
F15001143 AND FA15000082 AND ON.
#
AIRCRAFT
SERIALS 15075782 AND ON, A1500524
AND ON AND F15001144 AND ON
1.
Spinner
2.
Screw
*3.
Forward
Spinner
Bulkhead
(ABS)
#3A.
Forward
Spinner
Bulkhead
(Aluminum)
*4.
Spacer
5.
Propeller
6.
Rear
Spinner
Bulkhead
7. Dowel
Pin
8.
Spacer
9.
Washer
10.
Bolt
4 *
*
AIRCRAFT
SERIALS 15074851 & ON, A1500430
& ON, F1500l0l4 &ON, AND FA150002l2 & ON
·STANDARD
FOR
AIRCRAFT
SERIALS 15074851
& ON, A1500430 & ON, F15001014 & ON, AND
FA15002l2 & ON
8
CRANKSHAFT
(REF)
NOTES
Use
spacers
(4)
as
required
to
obtain
a
mismatch
of one
half
hole
between
spinner
and
rear
bulkhead
before
installing
screws
(2).
INST
ALL
PROPELLER
TO
TRAIL
TOP
DEAD
CENTER
30
DEGREES.
TORQUE
PROPELLER
MOUNTING BOLTS TO
300-360
LB-IN.
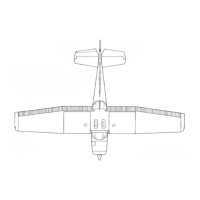
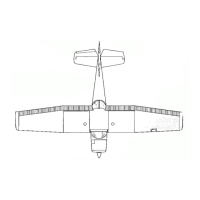
Figure
13-2.
Propeller
and
Spinner
Installation
3.
Remove
bolts
and
washers
and
pull
propeller
forward
to
remove.
NOTE
The
aft
spinner
bulkhead
(6)
is
installed
be-
tween
propeller
(5)
and
spacer
(8),
and
is
removed
as
the
propeller
is
removed.
4.
Using
a
punch
through
holes
in
forward
face
of
propeller,
drive
2 dowel
pins
(7)
aft
to
separate
propeller
and
spacer,
freeing
the
aft
spinner
bulk-
head.
c.
Beginning
with
aircraft
serials
15075782, A
A1500525
and
F15001144,
proceed
as
follows:
1.
Remove
safety
wire
from
mounting
bolt
heads
(10#).
2.
Remove
bolts
and
washers
and
remove
for-
ward
bulkhead
(10#).
IWARNINGl
Be
sure
magneto
switch
is
in
OFF
position
before
turning
propeller.
N<JrE
The
aft
spinner
bulkhead
(6)
is
installed
be-
tween
propeller
(5)
and
spacer
(8),
and
is
removed
as
the
propeller
is
removed.
3. Using
a.
punch
through
the
holes
in
forward
face
of
propeller,
drive
two
dowel
pins
(7)
aft
to
sep-
arate
propeller
and
spacer,
freeing
aft
spinner
bulk-
head.
13-7.
INSTALLATION. (Beginning
with
1971
Models.)
(Refer
to
figure
13-2.
)
a.
Clean
mating
surfaces
of
propeller,
crankshaft
Change
3
13-3