5-8
Cisco Unified Wireless IP Phone 7925G Administration Guide for Cisco Unified Communications Manager 7.0(1)
OL-15984-01
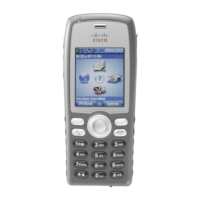
Chapter 5 Configuring Settings on the Cisco Unified Wireless IP Phone 7925G
Configuring Network Profile Settings
Step 3 The Phone Configuration window displays for that phone.
Step 4 Scroll to Device Information.
Step 5 Scroll to Cisco Discovery Protocol Settings.
Step 6 Click Enabled from pull-down menu.
Step 7 Click Save and Reset if prompted.
Erasing the Configuration
You can erase the network profile configuration and return to the default settings.
To erase the configuration, follow these steps:
Procedure
Step 1 Choose SETTINGS >Network Profiles.
Step 2 To select the profile name that you want to configure, scroll to the item and then press the Select button.
Step 3 Enter **# to unlock the profile and press Edit.
Step 4 Select Network Configuration.
Step 5 Scroll to Erase Configuration and press Yes to erase or No.
Related Topics
• Changing the Profile Name, page 5-3
• Configuring Wireless Settings for the Network Profile, page 5-8
Configuring Wireless Settings for the Network Profile
The WLAN Configuration menu contains settings that the phone uses to authenticate with an access
point. These settings include the SSIDs, authentication type, and encryption data that the phone uses.
This section includes these topics for configuring wireless settings:
• Accessing the WLAN Configuration Menu, page 5-8
• Changing WLAN Configuration Settings, page 5-9
Accessing the WLAN Configuration Menu
To access the WLAN Configuration menu options on a Cisco Unified Wireless IP Phone 7925G, follow
these steps:
Procedure
Step 1 Choose SETTINGS > Network Profiles.
Step 2 To select the profile name that you want to configure, scroll to the item and then press the Select button.
 Loading...