91
Technical Publication Document NO: SYSTEM-007-ENG (Ver.1.1)
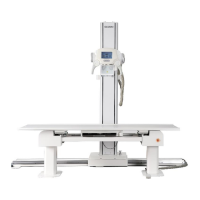
HF-525Plus Installation, Operation and Service Manual
5.11.4 Start Installation
Installation procedure of Ceiling tube support
● Check if the serial No. on the label is match with the serial No. on the quality certificate.
● During the unpacking, check if all the devices are in well condition, especially at cables. In case any
broken or damaged parts, please contact your local agent for replacements.
● Bring the devices to the installation place. (Do not assemble the devices in advanced) 2 or more
people are needed to move them because the devices are very heavy.
● Fix (install) the ceiling rail.
● Insert Ceiling Tube Support column unit to the ceiling rail.
● Press down the tube head (tube arm) to the easy wiring position and pull out the holding pin to the
fixing position. (Located upper side of Column unit)
● Then install X-ray tube, Handle Bar and collimator.
● Check the cable connections and make them tight if necessary.
● Make all the cable connections according to the cable diagram.
● If the cable & wire connections are O.K, put main AC input power to the Generator. (Check AC input
power level before you make Power ON)
● One person holds the X-ray tube and the other removes the holding pin at behind of Tube Stand.
● Check if the weight balance is O.K, if the balance is not perfect, add or remove the weight balances.
● PWR ON and check if electromagnetic lockup functions are all O.K – test it from Handle Bar.
● The engineers should stay in the room until the installation works are all over.
WARNING ▶
Pull out holding pin of Column unit to the fixing position before installation, and after installation,
release the holding pin to be used.