SYSTEM SETTING1.
SYSTEM TYPE SETTING1-1.
Set the DIP switch to the corresponding system type as shown in the table.
Do not use a nonexistent switch combination.
Note
Perform the system setting and address setting , before turning on the power.
¾
For the air conditioner to operate properly, perform the correct setting.
¾
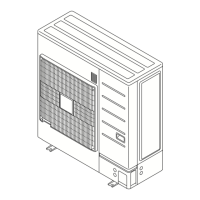
OUTDOOR UNIT SETTING
Set the outdoor unit address setting
Set the number of slave unit
Set the number of outdoor units installed
Refrigerant circuit address setting
Terminal resistor setting
Function setting
Set the DIP SW SET3-3 & 3-4
1 : SET3-3 OFF, SET3-4 OFF : Master x 1
2 : SET3-3 OFF, SET3-4 ON : Master x 1 Slave x 1
3 : SET3-3 ON , SET3-4 OFF : Mater x 1, Slave x 2
Set the DIP SW SET5-1 & 5-2
1 : SET5-1 OFF, SET5-2 OFF : Number of 1
2 : SET5-1 OFF, SET5-2 ON : Number of 2
3 : SET5-1 ON , SET5-2 OFF : Number of 3
Set the DIP SW SET3-1 & 3-2
Master : SET3-1 OFF, SET3-2 OFF
Slave 1 : SET3-1 OFF, SET3-2 ON
Slave 2 : SET3-1 ON , SET3-2 OFF
SETTING FOR MASTER UNIT & SLAVE UNIT.
SETTING FOR MASTER UNIT & SLAVE UNIT.
SETTING FOR MASTER UNIT & SLAVE UNIT.
SETTING FOR MASTER UNIT & SLAVE UNIT.
<step 1>
<step 2>
<step 3>
<step 4>
<step 5>
<step 7>
SETTING FOR MASTER UNIT ONLY.
( . . . Factory Setting)
Set the Rotary SW REF AD x10 & x1
See the switch detail for "1-2. Address setting"
Set the DIP SW SET5-4
See the switch detail for "1-6. Terminal resistor
setting"
Indoor unit connection check
<step 6>
See the detail for "1-7 Indoor unit connection check"
(This function is available J-II and J-IIS series)
(This function is available VR-II, V-II
and V-III series)
(This function is available VR-II, V-II
and V-III series)
(This function is available VR-II, V-II
and V-III series)
- (07-01) -
FUNCTION
SETTING
FUNCTION
SETTING
 Loading...