U41057-J19-Z146-1-76 July 2004 02–TX150S2–101
Removal/installation routines RemoteView medium
© Siemens Nixdorf Informationssysteme AG 1995 Pfad: P:\02-systemeinheiten\TX150S2\TX150S2-e\TX150S2-e.k04
.
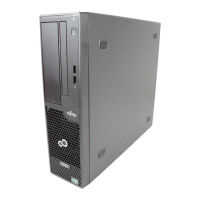
Ê Insert the chipDISK at the intended location on the hard disk cage and
attach it using the three screws.
Ê Connect the power plug connector P7 to the power connector on the
chipDISK.
Ê Connect the free end of the IDE cable to the primary IDE interface (1)
provided on the system board (see page 02-TX150S2-59).
The primary IDE channel remains hidden in the BIOS until a system
failure activates the chipDISK. Do not connect a second device to the
primary IDE channel; the chipDISK must occupy this channel alone.
You may, however, connect two devices (master and slave) to the
secondary IDE channel.
Removal is performed in reverse order.
Configuring the chipDISK
You must enter the chipDISK parameters in BIOS Setup and boot from the
chipDISK once using these parameters in order for RemoteView to be started
automatically later. Proceed as follows:
Ê Restart the server.
Ê Press [F2] when the message Press <F2> to enter SETUP is displayed on the
screen.
i

 Loading...