35
4
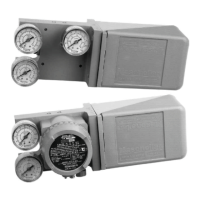
Installing the FVP110 on the Actuator
General
For installation of a FVP110, see “Choosing the Installation Location” on page 9. For the
ambient, environmental conditions required for installation, see “Standard Specifications” on
page 73.
To avoid injury or the process being affected when installing or replacing
a positioner on a control valve, ensure that:
❑ All inputs to the valve actuator and other accessories of the valve and
actuator, including the air supply and electric signal, are cut off.
❑ The process has been shut down or the control valve is isolated from
the process by using bypass valves or the like.
❑ No pressure remains in the valve actuator.
General Installation Procedures: FVP110 to the Actuator
An FVP110 can be installed on a valve actuator with a mounting bracket. Prepare the
bracket and clamp necessary to install the valve. In general, the installation method is
determined by the combination of the control valve and positioner, as well as by the valve
manufacturer who performs the adjustment. For details, consult the control valve
manufacturer.
Required Tools: To install an FVP110 prepare a nominal:
❑ 13-mm open end or box end wrench for M8 bolts used to fix the mounting bracket to
the positioner.
❑ 10-mm open end or box end wrench for M6 bolt used to fix the feedback lever to the
shaft.