○○○○○○○○○○○○○○○○○○○○○○
Quick Guide 1•47
○○ ○○○○○○○○○○○○○○○○○○○○
Quick Guide 1•47
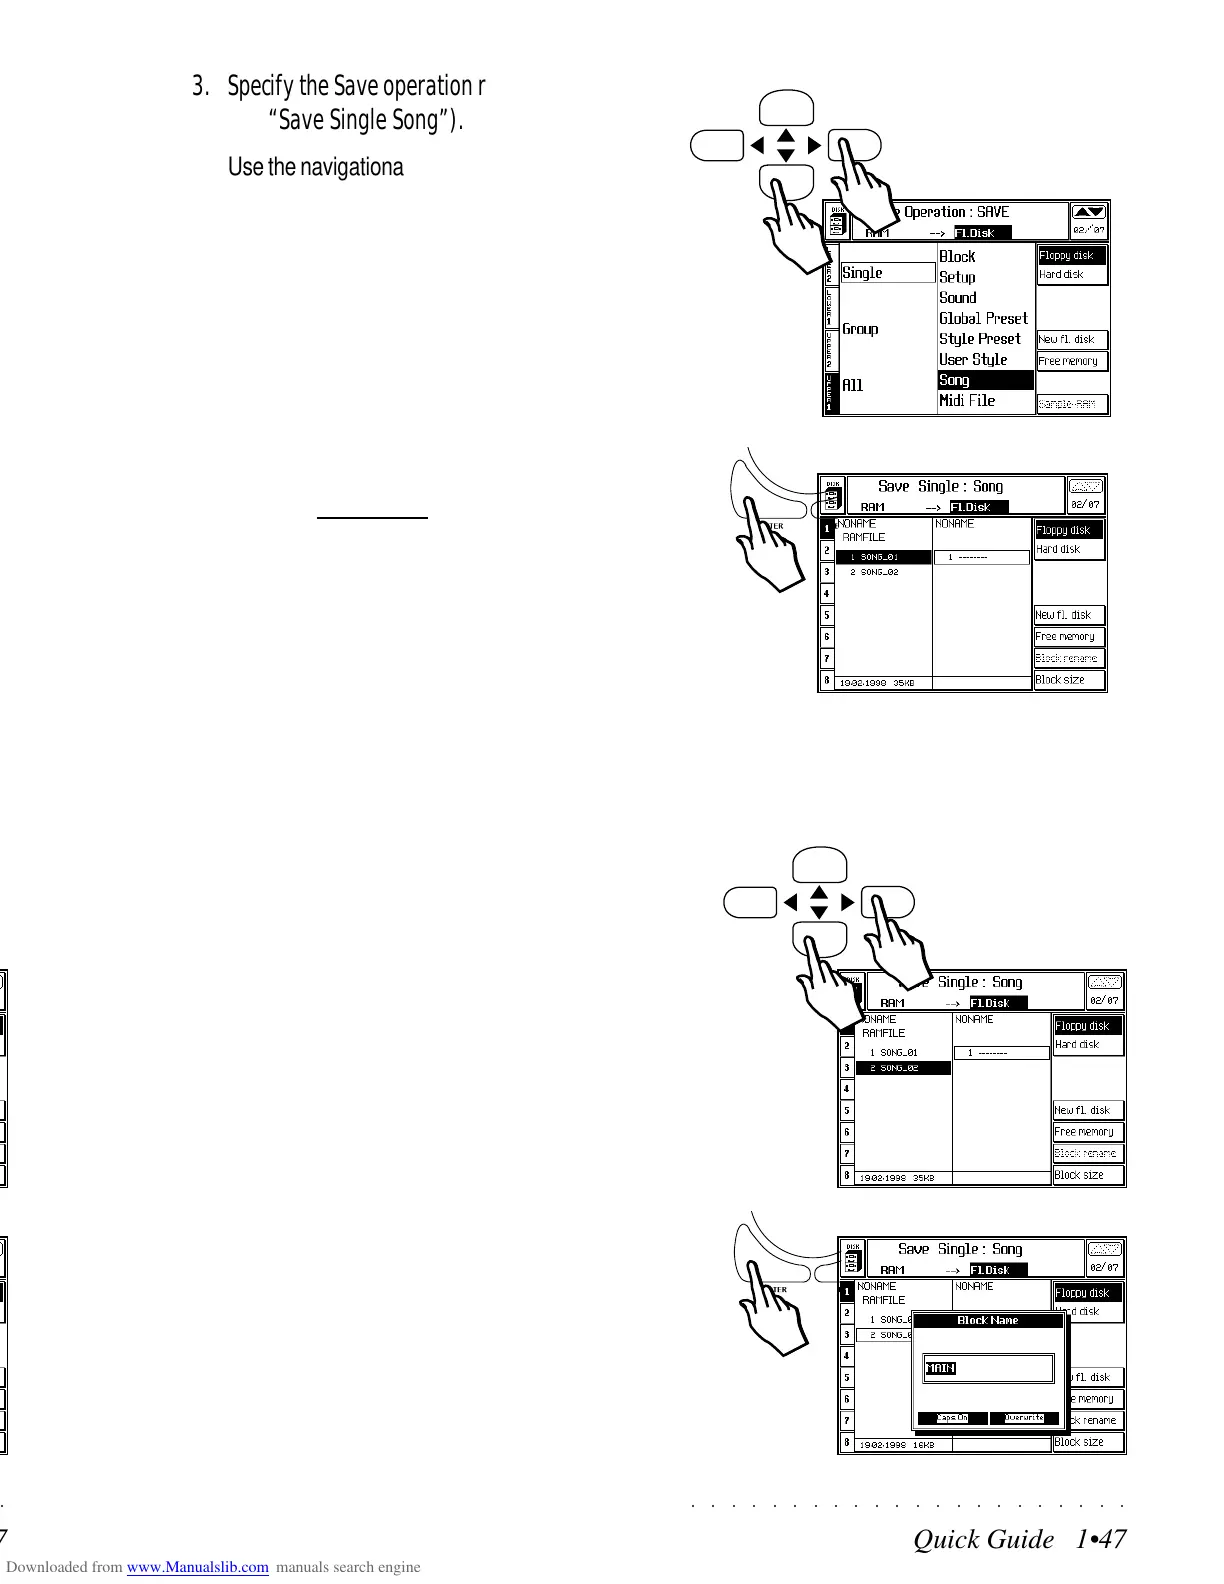
3. Specify the Save operation required (exam-
ple, “Save Single Song”).
Use the navigational arrows to navigate within
the two columns of the display area and se-
lect the required command by combining one
element from each column.
For example, combine “Single” from the left
column with “Song” from the right to specify
“Save Single Song”.
If you are using a MIDI file disk, specify “Sin-
gle MIDI File”.
4. Press ENTER to confirm the command and
open the File Selector.
The display shows the directories of the RAM
memory and the floppy disk, or Hard Disk.
In the example, the instrument’s RAM direc-
tory is shown with 2 songs (with generic
names).
If the disk is new (no Blocks present), the di-
rectory will be empty. If the disk is used, one
or more Block files may be present. If you
are working on the Hard Disk, several Block
files will be shown.
5. If necessary, select the Song that you want
to save and its destination, using the direc-
tional arrows.
A selected file is shown in negative highlight.
An empty destination is shown as a broken
line. A preselected destination is shown en-
closed by a rectangular frame.
You can choose to select an existing Block
as the destination, or create a new one by
selecting an empty one (broken line).
6. With a Floppy or Hard Disk destination se-
lected, press ENTER.
If you chose an empty destination in step 5
above, you’ll be prompted to create a new
Block. The name “MAIN” will suggested au-
tomatically. Use the keyboard to enter a
name for the block.
3
4
5
6
3. Specify the Save operation required (exam-
ple, “Save Single Song”).
Use the navigational arrows to navigate within
the two columns of the display area and se-
lect the required command by combining one
element from each column.
For example, combine “Single” from the left
column with “Song” from the right to specify
“Save Single Song”.
If you are using a MIDI file disk, specify “Sin-
gle MIDI File”.
4. Press ENTER to confirm the command and
open the
File Selector.
The display shows the directories of the RAM
memory and the floppy disk, or Hard Disk.
In the example, the instrument’s RAM direc-
tory is shown with 2 songs (with generic
names).
If the disk is new (no Blocks present), the di-
rectory will be empty. If the disk is used, one
or more Block files may be present. If you
are working on the Hard Disk, several Block
files will be shown.
5. If necessary, select the Song that you want
to save and its destination, using the direc-
tional arrows.
A selected file is shown in negative highlight.
An empty destination is shown as a broken
line. A preselected destination is shown en-
closed by a rectangular frame.
You can choose to select an existing Block
as the destination, or create a new one by
selecting an empty one (broken line).
6. With a Floppy or Hard Disk destination se-
lected, press ENTER.
If you chose an empty destination in step 5
above, you’ll be prompted to create a new
Block. The name “MAIN” will suggested au-
tomatically. Use the keyboard to enter a
name for the block.
3
4
5
6
○○○○○○○○○○○○○○○○○○○○○○
Quick Guide 1•47
○○ ○○○○○○○○○○○○○○○○○○○○
Quick Guide 1•47
3. Specify the Save operation required (exam-
ple, “Save Single Song”).
Use the navigational arrows to navigate within
the two columns of the display area and se-
lect the required command by combining one
element from each column.
For example, combine “Single” from the left
column with “Song” from the right to specify
“Save Single Song”.
If you are using a MIDI file disk, specify “Sin-
gle MIDI File”.
4. Press ENTER to confirm the command and
open the File Selector.
The display shows the directories of the RAM
memory and the floppy disk, or Hard Disk.
In the example, the instrument’s RAM direc-
tory is shown with 2 songs (with generic
names).
If the disk is new (no Blocks present), the di-
rectory will be empty. If the disk is used, one
or more Block files may be present. If you
are working on the Hard Disk, several Block
files will be shown.
5. If necessary, select the Song that you want
to save and its destination, using the direc-
tional arrows.
A selected file is shown in negative highlight.
An empty destination is shown as a broken
line. A preselected destination is shown en-
closed by a rectangular frame.
You can choose to select an existing Block
as the destination, or create a new one by
selecting an empty one (broken line).
6. With a Floppy or Hard Disk destination se-
lected, press ENTER.
If you chose an empty destination in step 5
above, you’ll be prompted to create a new
Block. The name “MAIN” will suggested au-
tomatically. Use the keyboard to enter a
name for the block.
3
4
5
6
3. Specify the Save operation required (exam-
ple, “Save Single Song”).
Use the navigational arrows to navigate within
the two columns of the display area and se-
lect the required command by combining one
element from each column.
For example, combine “Single” from the left
column with “Song” from the right to specify
“Save Single Song”.
If you are using a MIDI file disk, specify “Sin-
gle MIDI File”.
4. Press ENTER to confirm the command and
open the
File Selector.
The display shows the directories of the RAM
memory and the floppy disk, or Hard Disk.
In the example, the instrument’s RAM direc-
tory is shown with 2 songs (with generic
names).
If the disk is new (no Blocks present), the di-
rectory will be empty. If the disk is used, one
or more Block files may be present. If you
are working on the Hard Disk, several Block
files will be shown.
5. If necessary, select the Song that you want
to save and its destination, using the direc-
tional arrows.
A selected file is shown in negative highlight.
An empty destination is shown as a broken
line. A preselected destination is shown en-
closed by a rectangular frame.
You can choose to select an existing Block
as the destination, or create a new one by
selecting an empty one (broken line).
6. With a Floppy or Hard Disk destination se-
lected, press ENTER.
If you chose an empty destination in step 5
above, you’ll be prompted to create a new
Block. The name “MAIN” will suggested au-
tomatically. Use the keyboard to enter a
name for the block.
3
4
5
6
 Loading...

