EasyManua.ls Logo

Honda C65 - Kickstarter Disassembly; Kickstarter Inspection; Kickstarter Reassembly; Component Parts of Kickstarter View

Honda C65
127 pages
Print Icon
To Next Page IconTo Next Page
To Previous Page IconTo Previous Page
Loading...
36
3.
ENGINE
Kick
starter
ratchet
sp
indl
e
ra
chet
spr
i
ng
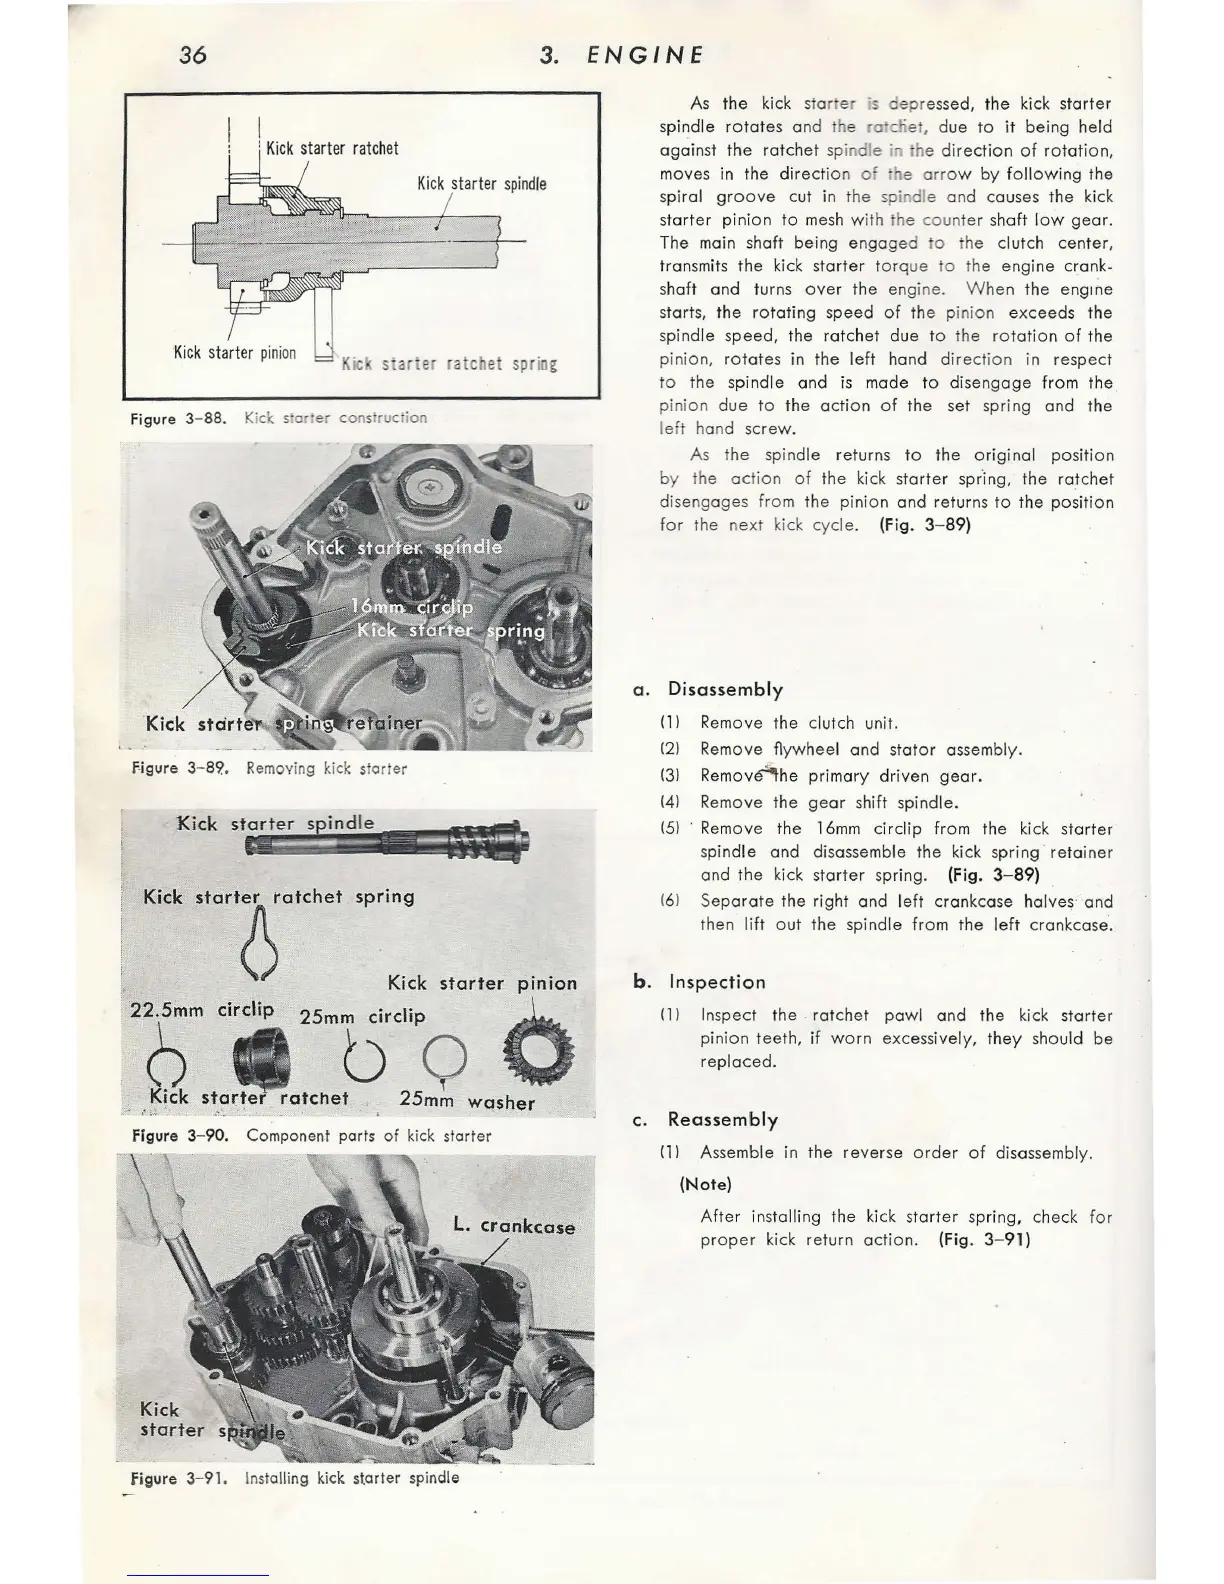
Figure 3- 88.
f·igure 3-89..
Removing
kick starter
.Kick
starter
s
indle
Kick
spring
Kick
starter
pinion
22.5mm
circlip
0
K!ck
starte
.'•
!..:
25mb"'P
o
ratchet
. . 25mm
washer
Figure 3-
90
. Component ports
of
kick starter
fig
ure 3- 91. I
nst
alling kick starter
spi
ndle
As
the
kick sta
rter
is
depr
essed,
the
kick s
tarter
spindle
rotate
s
and
the
ro
diet,
due
to
it
being
held
against
the
ratche
t
sp
ind
le in ihe
direct
ion
of
ro
tation,
move
s in
the
dire
ction
of
ih
e
arrow
by
f
ol
lo
w ing
the
spiral
groove
c
ut
in
the
spindle
and
cau
ses
the
kick
starter
pinion
to
mesh
with
the
count
er s
haft
l
ow
gear.
The main shaft
being
enga
ged
to
the clutch
center,
tran
smits
th
e kick
starter
torq
ue
to
the
engine crank-
s
haft
and
turns
ove
r
the
engine.
Wh
en the eng1ne
starts,
the
ro
tating
speed
of
the
p
inio
n e
xce
eds
the
sp
indle
speed,
the
ratchet
due
to
the
rota
ti
on
of
the
pinion,
rotates
in
the
le
ft hand
direction
in
respect
to
the
sp
indl
e
and
is made to
disengage
fro
m
the
pinion
due
to
the
a
ct
io n
of
the
set
sp
r
ing
and
the
l
eft
hand scr
ew
.
As
the
spindle returns to
the
o ri
gin
al
position
by
the ac
tion
of
the
kick
st
art
er spr"ing,
the
ratc
het
disengages
from
the
pinion
and
returns
to
the
position
for
the
next
kick
cycle.
(Fig. 3-
89)
a.
Disassembly
(
ll
Remove
the
clutch unit.
(2}
Remove
flywheel
and
stator
assembly.
(3}
Remove4'rhe
primary
dr
iven
gear.
(4}
Remove the
gea
r s
hif
t s
pin
dle .
(5}
·
Rem
ove
the 16mm ci
rclip
from
the
kick s
tart
er
spindle
and
disassemble the kick sp
ring
·
retainer
and
the
kick s
tarter
spring. (Fig.
3-89)
(6}
Se
parate
the right
and
l
eft
crankcase
halve
~
and
then
lift
out
the
spindle
fr
o m
the
le
ft
crankcase·.
b.
Inspection
(J} Inspect
the
ratchet
paw
l
and
the
kick st
arter
pinion
teeth,
if
wo
rn excessivel
y,
they
s
hould
be
replaced.
c.
Reassembly
(11
Assemble
in
the reverse
orde
r
of
disassembly.
(Note)
After
installing
the
kick
starter
spring, check f
or
proper
ki
ck
retu
rn ac
tion.
(Fig. 3-
91)

Table of Contents