EasyManua.ls Logo

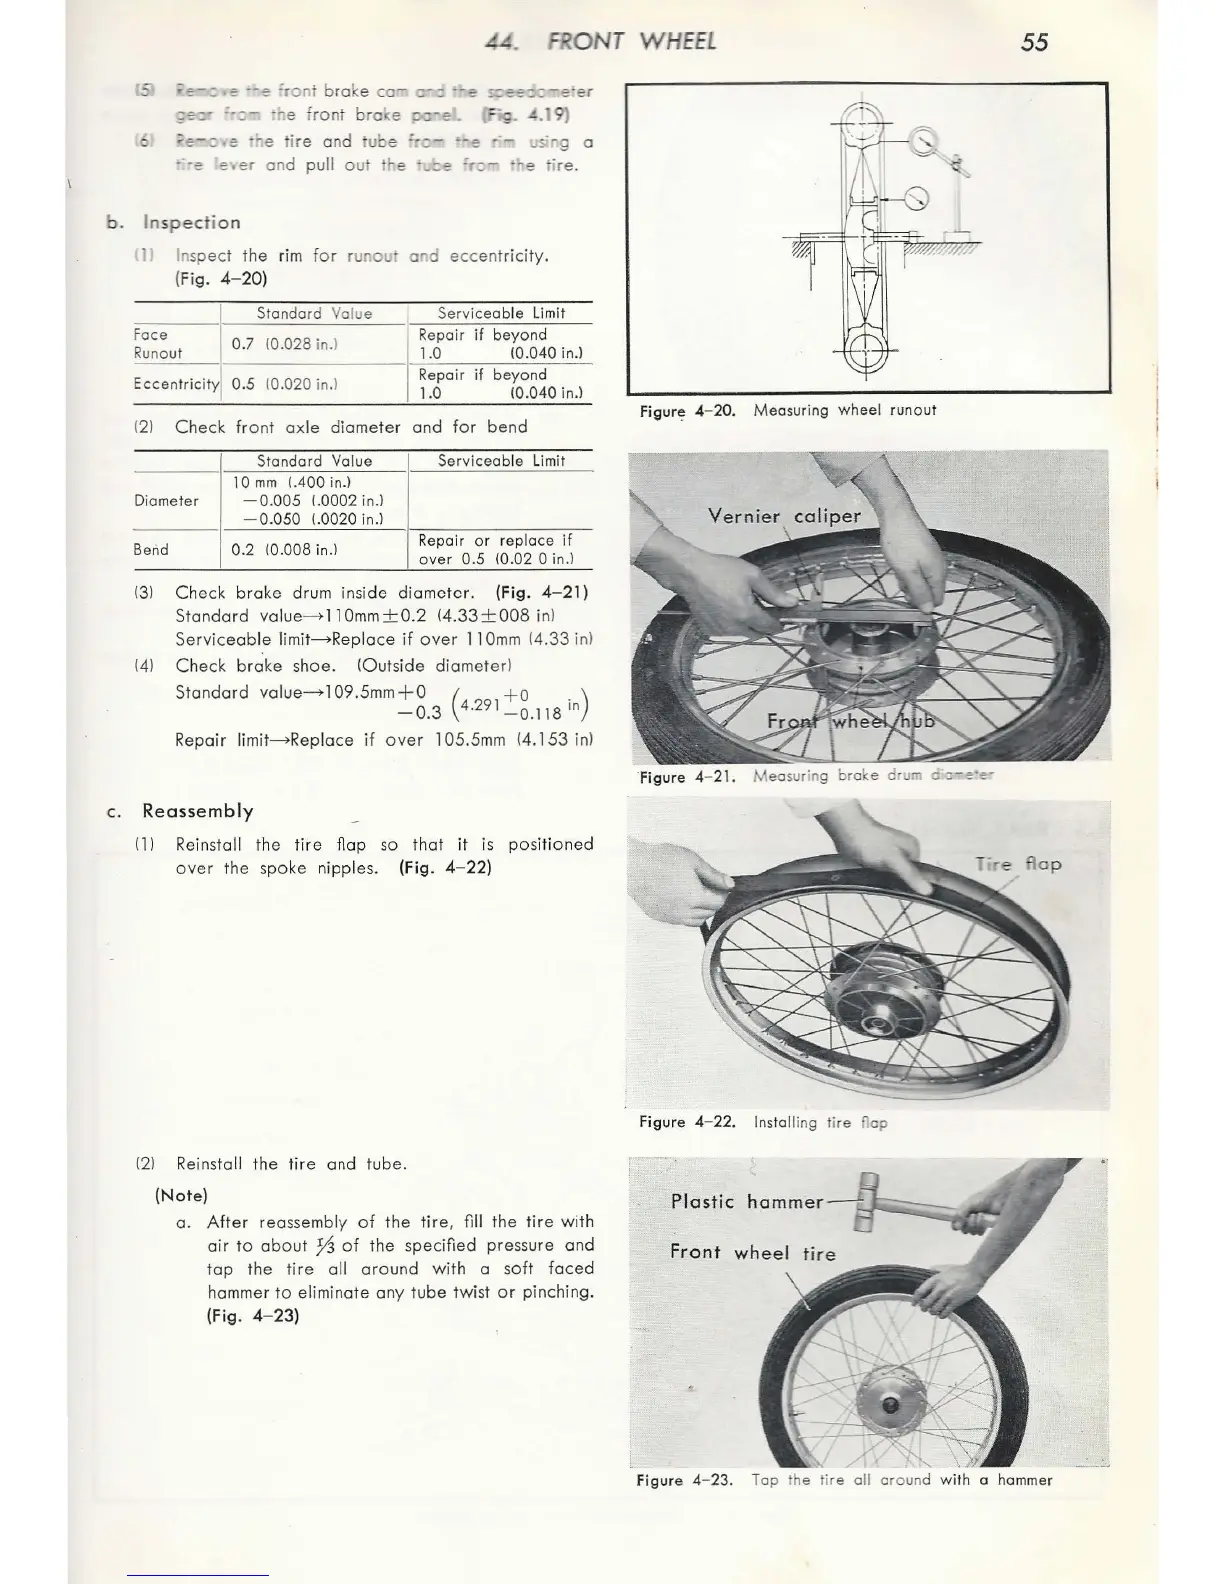
Honda C65 - Front Wheel Inspection; Front Wheel Reassembly; Measuring Wheel Runout Diagram; Measuring Brake Drum Diameter

Honda C65
127 pages
Print Icon
To Next Page IconTo Next Page
To Previous Page IconTo Previous Page
Loading...
44.
0 T
WHEEL
55
.:J
·=-- :
--=
'r
on
! b
ro
ke
co-
::-::
--=
s::-ee:::.::-e·er
;e::-
=-::- ·he
front
bro
. e
:xr-:
. - _.
~.1
;e-::
e ·
r.
e tire
and
tube
=-::-
·-e
---
~
s·"
g
a
-·
·e
e .
er
and
pull
out
e
·.::e
'r
::-
·~e
tire.
b.
In
spect
i
on
11
In
sp
ect
the rim
for
ru
no , and
eccentric
ity.
(
Fig.
4- 20)
Standard
Va
l
ue
Serviceable Limit
Face Repair
if
beyond
Runou
t
0.7 !0.028
in
.)
1.0
!0.040
in.)
Eccentricity
0.5 (0.020
in
.)
Repair if beyond
1.0
!0.
040
in.l
{2)
Check
front
axle
diamete
r
and
for
bend
Stan
dard Value
Serviceable
Limit
10
mm
!.400
in
.)
Diameter
-0.005
!.0002 in.l
- 0.050
!.0020
in.l
Bend
0.2
!0
.008
in
.)
Repair
or
replace
if
over 0.5
(0.02 0
in
.l
{3)
Ch
ec
k
brok
e drum inside
diameter.
(Fig. 4- 2 1)
Sta
ndard
value
.........
11
0mm±0.2
!4
.
33±008
in
)
Serv
ic
eable
limit
.........
Replace
if
over
11
Omm
{
4.33
in)
!41
Che
ck
brake
shoe.
!Ou
ts
id
e d
ia
meter)
Standard
value
.........
109.5mm+ O ( +o )
- 0
.3
4.291 _ 0
.1
18
in
Repair limit
.........
Repla
ce
if
over
1
05
.
5mm
(4.153
in
l
c.
Reassembly
( 1 J Reinstall the
tire
flap
so
that
it
is
positioned
over
the
s
poke
nipples. (Fig. 4- 22)
!2
1 Reinstall the
tire
and
tub
e.
(Note)
a.
After
rea
ss
em
bly
of
the
tire, fill the
tire
with
air
to
ab
o
ut
7§
of
the speci
fied
pre
ss
ure
and
tap
the
ti
re all
around
with a
soft
faced
hammer to elimina
te
any
tube
twist
or
pinching.
(Fig. 4- 23)
Figur~
4-20.
Me
asu
ring wheel runout
F
ig
ure 4- 22. Installi
ng
tire nap
Figure
4- 23. Top t
he
tire all a
ro
und with a
hammer

Table of Contents