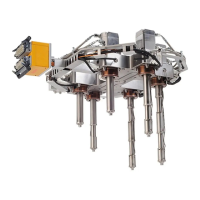
Figure 6-49: Installing the Sprue Heater
1. Front Ring 2. Retaining Clip 3. Sprue Heater 4. Sprue Bushing 5. Thermocouple
2. Install the retaining clip into the groove on the sprue bushing.
3. Using a heater removal tool, pull the sprue heater up until it makes contact with the
retaining clip. Refer to Section 1.8 for a list of special Husky tools and order numbers.
NOTE:
All wiring near the sprue heater must be either a high temperature braid or sleeved using a high
temperature sleeving.
4. Connect the thermocouple to the sprue heater.
5. Route the sprue heater and thermocouple wires through the wire channels in the manifold
plate. Make sure all wiring is properly retained in the wire channels using wire clips.
6. Thread the front ring onto the sprue heater and tighten by hand.
7. Label each wire with the heater zone number. Refer to the electrical schematic for the zone
number.
8. Crimp the wire ends and connect them to the appropriate multi-pin connectors. Refer to the
electrical schematic for more information.
9. Test the sprue heater. Refer to Section 6.13 for more information.
10. Install the hot runner into the machine. Refer to Section 4.2 for more information.
6.18
Removing and Installing the Sprue Bushing
The following procedures describe how to remove, maintain and install the sprue bushing.
Hot Runner Installation Manual v 2.2 — March 2021 Maintenance
Removing and Installing the Sprue Heater (If Equipped) 115