CAUTION!
Mechanical hazard – risk of damage to the mold and hot runner. The nozzles and manifold
must be at room temperature (< 25 °C or < 77 °F) before the cavity plate is connected to the
hot runner. Severe damage to the nozzle and cavity plate sealing diameters can result if the
mold is still hot.
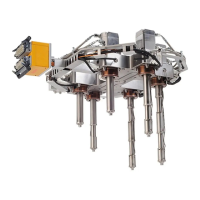
7. Align the cavity plate with the alignment dowels and lower the plate onto the hot runner.
Make sure the wires in the wire channels are not pinched between the plates while closing.
8. Disconnect the overhead lifting device and remove the hoist rings.
9. Remove the feet from the bottom of the cavity plate.
10. Install safety latch bars between the cavity plate and hot runner on both sides of the
assembly. A minimum of two safety latch bars are required.
11. Install the screws that secure the cavity plate to the hot runner and torque them to the
specied value. Refer to the manufacturer’s documentation for torque requirements.
12. Check the electrical circuit with an ohmmeter to make sure no wires were damaged during
installation. Refer to the electrical schematic to identify each zone.
6.14.3
Removing the Cavity Plate In the Machine
To remove the cavity plate from the hot runner when the assembly is in the machine, do the
following:
WARNING!
Hot resin spray hazard – risk of serious injury. Residual pressure from gases in the hot
runner could cause hot resin to spray from the nozzle tips when released. Make sure the
valve gates are open when turning o the heaters to relieve pressure in the hot runner.
CAUTION!
Mechanical hazard – risk of damage to the hot runner. Do not actuate the valve stems when
the hot runner is cold. Damage to the valve stems could occur.
1. Open the valve gates.
2. Cool the mold by running coolant through it until the hot runner nozzles and manifold(s) are
at room temperature (< 25 °C or < 77 °F). This may take 1/2 to 4 hours depending on the size
of the hot runner.
3. Open the clamp.
4. Lock out and tag the machine and controller (if equipped). Refer to Section 2.5 for more
information.
5. Purge all cooling water from the cooling hoses to minimize the risk of a coolant spill should a
hose come loose during maintenance. Refer to the machine manufacturer’s documentation
for more information.
Hot Runner Installation Manual v 2.2 — March 2021 Maintenance
Removing and Installing the Cavity Plate 101