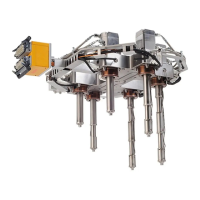
4. Attach an overhead lifting device to the hoist rings and lift the cavity plate. Use the pry slots
between the plate and hot runner to help separate the cavity plate.
WARNING!
Crushing hazard – risk of death or serious injury. Do not work under suspended loads. To
prevent injury, install safety blocks.
5. If equipped, install feet on the bottom of the cavity plate to protect the hose ttings.
6. Move the cavity plate out of the work area. Store the plate in a location where the plate
cannot fall or tip over.
7. If equipped, remove the nozzle tip insulators from the nozzle tips and/or cavity plate. Refer
to Section 6.19 for more information.
8. Remove any insulating gate bubbles on the nozzle tips or in the cavity plate gate details.
Refer to Section 6.16 for more information.
6.14.2
Installing the Cavity Plate On a Work Bench
To secure the cavity plate to the hot runner when the assembly is on a work bench, do the
following:
NOTE:
The following procedure assumes the cavity plate was removed as described in Section 6.14.1
NOTE:
The following procedure requires the use of an overhead lifting device. Refer to Section 4.1 for
lifting and handling instructions.
CAUTION!
Mechanical hazard – risk of damage to the hot runner. Make sure all valve stems are in the
still in the open position prior to installation.
1. Make sure the hot runner is on a work bench with the nozzle tips facing up. The hot runner
must be supported by two blocks.
2. Make sure the nozzle and cavity plate sealing diameters are clean and free of burrs or oil.
Hot Runner Installation Manual v 2.2 — March 2021 Maintenance
Removing and Installing the Cavity Plate 99