CAUTION!
Mechanical hazard – risk of damage to the mold and hot runner. The nozzles and manifold
must be at room temperature (< 25 °C or < 77 °F) before the cavity plate is separated from
the hot runner. Severe damage to the nozzle and cavity plate sealing diameters could result
if the mold is still hot.
15. Open the clamp.
16. Lock out and tag the machine and controller (if equipped).
17. If equipped, remove the nozzle tip insulators from the nozzle tips and/or cavity plate. Refer
to Section 6.19 for more information.
18. Remove any insulating gate bubbles on the nozzle tips or in the cavity plate gate details.
Refer to Section 6.16 for more information.
6.14.4
Installing the Cavity Plate In the Machine
To secure the cavity plate to the hot runner when the assembly is in the machine, do the
following:
NOTE:
The following procedure assumes the cavity plate was removed as described in Section 6.14.3.
1. Lock out and tag the machine and controller (if equipped). Refer to Section 2.5 for more
information.
2. Make sure the nozzle and cavity plate sealing diameters are clean and free of burrs or oil.
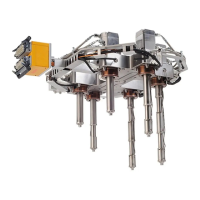
Figure 6-41: Cavity and Nozzle Sealing Diameters
1. Nozzle and Cavity Plate Sealing Diameters 2. Gate Bubble 3. Cavity Plate 4. Nozzle Housing
5. Manifold Plate
3. Apply a static application grease to the hot runner alignment dowels. Refer to Section 3.9 for
information about recommended lubricants.
4. If equipped, install the nozzle tip insulators. Refer to Section 6.19 for more information.
5. Remove all locks and tags.
6. Reduce the clamp opening and closing speed.
Hot Runner Installation Manual v 2.2 — March 2021 Maintenance
Removing and Installing the Cavity Plate 103