••:/
\
® ® ® ® ® ®
i
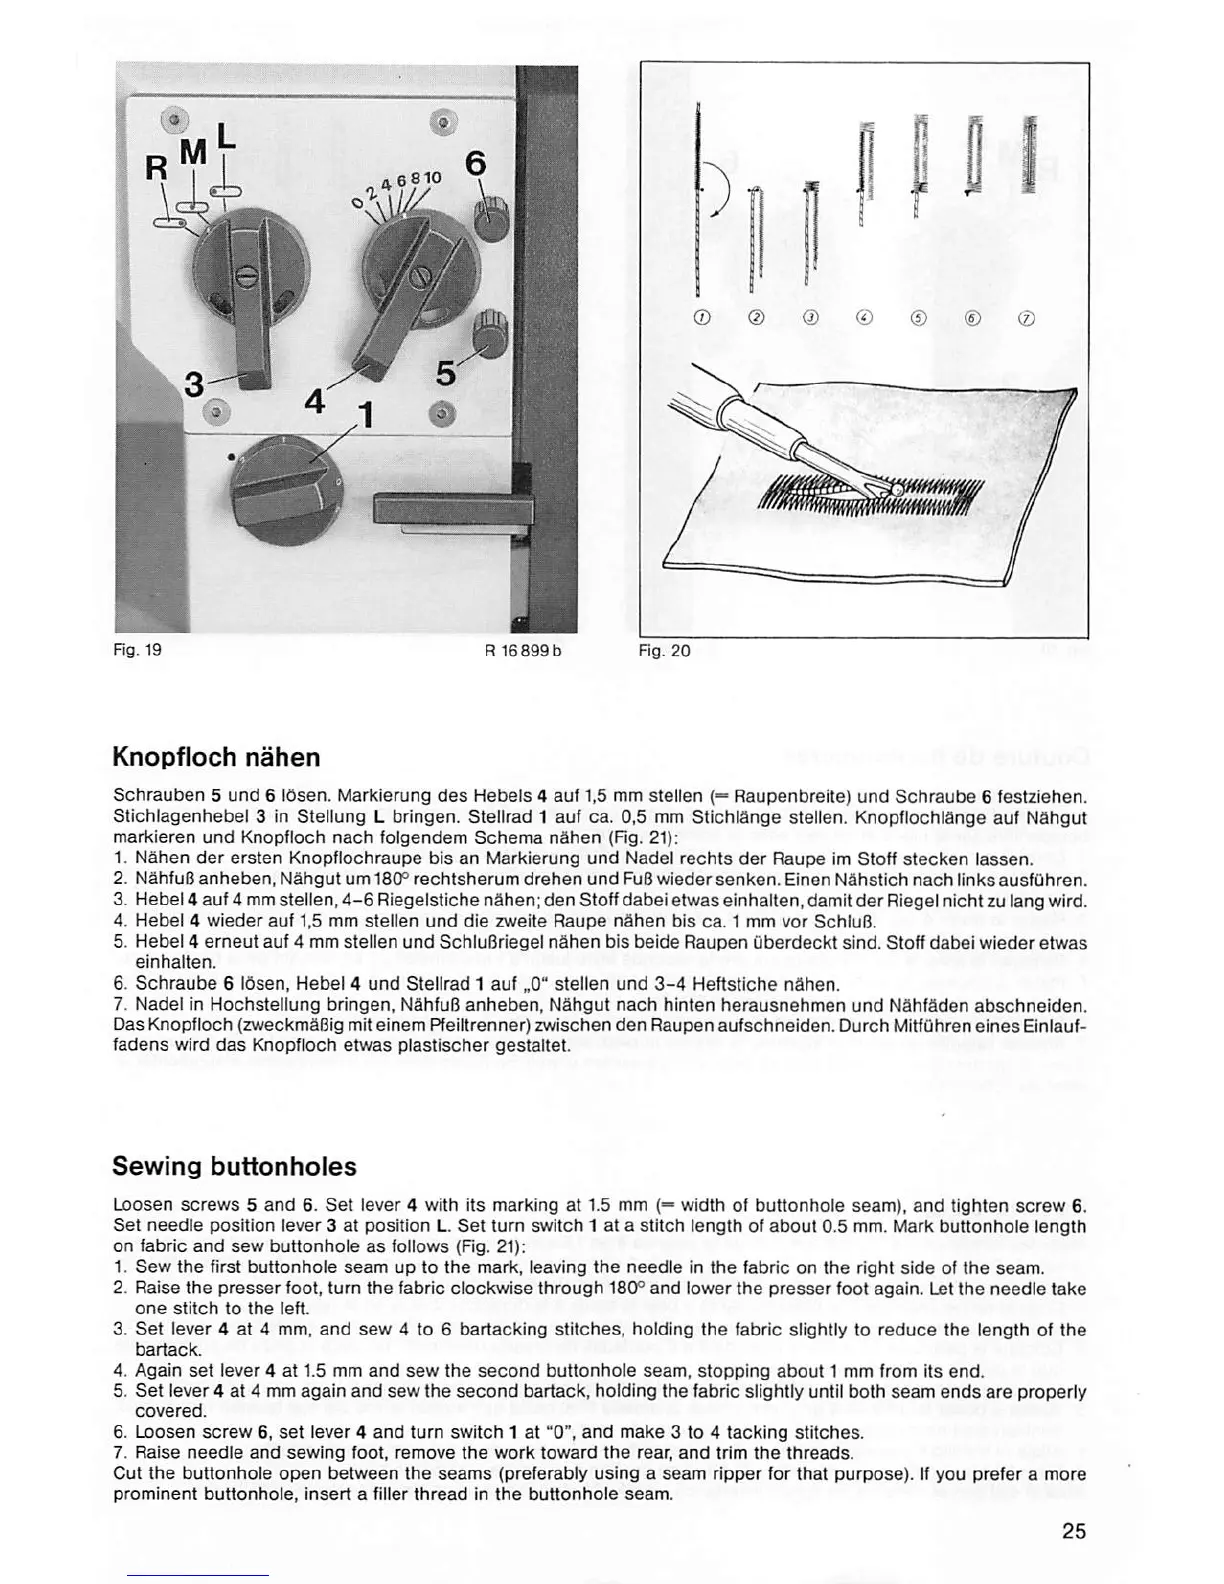
Knopfioch
nahen
Schrauben
5
und
6
Idsen.
Markiemng
des
Hebels
4
auf
1,5 mm
stellen
(—
Raupenbrette)
und
Schraube
6
festziehen.
Stichlagenhebel 3 in Stellung L bringen. Stellrad 1 auf ca. 0,5 mm StichlSnge stelfen. KnopflochlSnge auf NShgut
markieren
und
Knopflocti
nacti
folgendem
Schema
nShen
(Rg.
21):
1.
Nahen
der
ersten
Knopflochraupe
bis an Markierung
und
Nadel
rechts
der
Raupe
Im Stoff
stecken
lassen.
2. NahfuB
anheben,
NShgut
um 180='
rechtsherum
drehen
und
FuB
wiedersenken.
Einen
Ndhstich
nach
linksausfOhren.
3. Hebe! 4 auf 4 mmstellen,
4-6
RIegelstiche ndhen;
den
Stoff dabei etwaseinhaiten,damit
der
Riegel nicht zu lang wird.
4.
Hebel
4
wieder
auf
1,5 mm
stellen
und
die
zweite
Raupe
ndhen
bis
ca.
1 mm
vor
SchluB.
5.
Hebel
4
erneutauf
4 mm
stellen
und
SchluBrlegel
nShen
bis
beide
Raupen
Uberdeckt
sind. Stoff
dabel
wieder
etwas
einhaiten.
6.
Schraube
6
Idsen,
Hebel
4
und
Stellrad
1
auf
,0"
stellen
und
3-4
Heftstlche
nahen.
7.
Nadel
in
Hochstellung
bringen,
NShfuB
anheben,
Ndhgut
nach
hlnten
herausnehmen
und
Nahfaden
abschneiden.
Das
Knopfioch
(zweckmSBig mil
einem
Pfeillrenner)
zwischen
den
Raupen
aufschneiden.
Durch
Mitfflhren
eines
Elnlauf-
fadens
wird
das
Knopfioch
etwas
plastlscher
gestaltet.
Sewing
buttonholes
Loosen
screws
5
and
6.
Set
lever 4 with its marking at 1.5 mm
(-
width of
buttonhole
seam),
and
tighten
screw
6.
Set
needle
position lever 3 at position L.
Set
turn
switch
1 at a
stitch
length
of
about
0.5 mm. Mark
buttonhole
length
on
fabric
and
sew
buttonhole
as
follows
(Rg. 21):
1.
Sew
the
first
buttonhole
seam
up to
the
mark, leaving
the
needle
in
the
fabric on
the
right
side
of
the
seam.
2.
Raise
the
presser
foot, turn
the
fabric
clockwise
through
180°
and
lower
the
presser
foot
again.
Let
the
needle
take
one
stitch
to
the
left.
3.
Set
lever 4 at 4 mm,
and
sew
4 to 6
bartacking
stitches,
holding
the
fabric slightly to
reduce
the
length
of
the
bartack.
4.
Again
set
lever
4
at
1.5 mm
and
sew
the
second
buttonhole
seam,
stopping
about
1 mm from its
end.
5.
Set
lever
4 at 4 mm
again
and
sew
the
second
bartack,
holding
the
fabric
slightly
until
trath
seam
ends
are
properly
covered.
6. Ljocsen
screw
6,
set
lever
4
and
turn
switch
1
at
"0",
and
make
3 to 4
tacking
stitches.
7.
Raise
needle
and
sewing
foot,
remove
the
work
toward
the
rear,
and
trim
the
threads.
Cut
the
buttonhole
open
between
the
seams
(preferably
using
a
seam
ripper
for
that
purpose).
Ifyou
prefer
a
more
prominent
buttonhole,
insert
a filler
thread
in
the
buttonhole
seam.