175
FRONT FORK
Disassembly
1. Raise vehicle high enough to provide room for the
fork to be removed from from bottom of vehicle.
WARNING
!
• When it is necessary to raise the vehicle for any
repair or service, use jackstands to provide ade-
quate support. DO NOT rely on hydraulic or
mechanical jacks for support.
2. Disassemble the steering gear assembly.
3. Remove front wheel assembly and related parts.
4. Remove top jam nut on fork.
5. Remove second jam nut securing fork in frame and
carefully lower fork assembly.
NOTICE
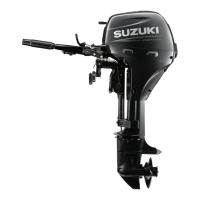
• Care must be used in removing the fork. There are
(28) loose ball bearings in the bottom and (20) loose
ball bearings on the top end of fork tube in the frame.
Refer to Figure 18 for proper parts stack–up.
1. Jam Nut
2. Dust Seal Cover
3. Wave Washer
4. Washer
5. Dust Seal
6. Upper Bearing Cone
7. 3/16” Ball
8. Upper Bearing Cup
9. Upper Fork Bushing
10. Lower Bearing Cup
11. 1/4” Ball
12. Lower Bearing Cone
13. Felt Dust Shield
14. Large Washer
FIGURE 18
1
2
3
4
5
6
7
8
9
10
11
12
13
14
6. Clean and inspect all parts for wear and damage. If
parts are worn or damaged, replace with new parts.
Reassembly
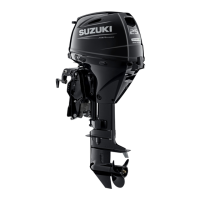
7. Place 1/4” (6.4 mm) ball bearings in lower bearing
cone. Apply a liberal amount of wheel bearing lubri-
cant. Place felt dust shield around bearings to hold
them in place. See Figure 19.
8. Place 3/16” (4.7 mm) ball bearing in upper bearing
cup. Apply liberal amount of wheel bearing lubricant.
Place dust shield around bearings to hold them in
place. See Figure 19.
1
2
4388
FIGURE 19
1. Bottom ball, cone and dust seal
2. Top ball, cone and dust seal
9. Place large washer onto fork. See Figure 18 for
proper location of parts.
10. Place bearing cone with 1/4” (6.4 mm) balls, cup and
dust seal in place onto fork. Install fork into frame.
11. Install upper fork bushing with bearing cup, 3/16”
(4.7 mm) balls, cone, dust seal, washer, two wave
washers, dust seal and cover. Refer to Figure 18 for
proper location of parts.
12. Secure parts in place by installing the lower jam nut
to fork threads. Snug nuts tight enough to hold fork
assembly into frame tube securely.
13. Install front wheel assembly.
14. Refer to following fork bearing adjustment.
FORK BEARING ADJUSTMENT
1. Raise the front of the vehicle off the floor.