31
Reservoir tank
0.5 liters
(1.1/0.9 US/Imp pt.)
Total
4.7 liters
(10.0/8.3 US/Imp pt.)
CAUTION
!
When changing engine coolant, use mixture of
50% water and 50% anti–freeze for regions
where ambient temperatures fall lower than –16
degrees C (3 degrees F) in winter and mixture of
70% water and 30% anti–freeze for regions
where ambient temperatures do not fall lower
than –16 degrees C (3 degrees F).
Even in regions where no freezing temperature
is anticipated, a mixture of 70% water and 30%
anti–freeze should be used for the purpose of
corrosion protection and lubrication.
COOLING SYSTEM HOSES AND CONNEC-
TIONS INSPECTIONS
1) Visually inspect cooling system hoses for any evi-
dence of leakage and cracks. Examine them for dam-
age, and check connection clamps for tightness.
2) Replace all hoses which show evidence of leakage,
cracks or other damage. Replace all clamps which can-
not maintain proper tightness.
EXHAUST PIPES AND MOUNTINGS
INSPECTION
WARNING
!
To avoid danger of being burned, do not touch
exhaust system when system is hot. Any ser-
vice on exhaust system should be performed
when system is cool.
When carrying out periodic maintenance, or the
vehicle is raised for other service, check exhaust sys-
tem as follows:
Check rubber mountings for damage, deterio-
ration, and out of position.
Check exhaust system for leakage, loose con-
nections, dents and damages. If nuts or bolts
are loose, tighten them to specification. Refer
to below chart for torque specifications.
Check nearby body areas for damaged, mis-
sing, or mispositioned parts, open seams,
holes, loose connections or other defects
which could permit exhaust fumes to seep into
the vehicle.
Any defects should be fixed at once.
Bolts and nuts Tightening torque
Exhaust pipe bolts and
nuts
40–60 N–m
4.0–6.0 kg–m
29.0–43.0 lb–ft
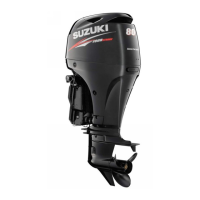
SPARK PLUGS REPLACEMENT
1) Remove scews holding ignition coils, remove ignition
coils.
IGNITION COIL
2) Using a spark plug socket, loosen and remove plugs.
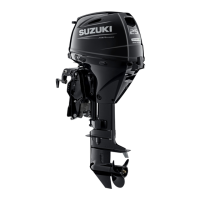
NOTE:
When replacing spark plugs, make sure to use new
plugs of specified heat range and size.
SPARK PLUG SPECIFICATIONS
Manufacturer
Heat Range
Standard type
NGK DCPR7E
Nippondenso XU22EPR–U
3) Install new spark plug. Tighten plugs to specification.
4) Connect ignition coil to spark plugs. Secure with the
orginal hardware.