72-20-17 VALVE ROCKERS.
Worn bushing may be driven out with a suitable drift, and
if
properly
designed, the same tool may be used to drive in new bushings. The rocker must be supported
on a ring which will allow the old bushing to pass through. Press the new bushing in flush
with the rocker hub after dipping it in clean lubricating oil. Ream the new bushing to the
specified diameter reaming. It is advisable to plug the oil holes with beeswax before reaming,
but be sure to remove the wax afterwards.
Lightly break the sharp edge at each end. (Refer
to Figure 72-20-1 7).
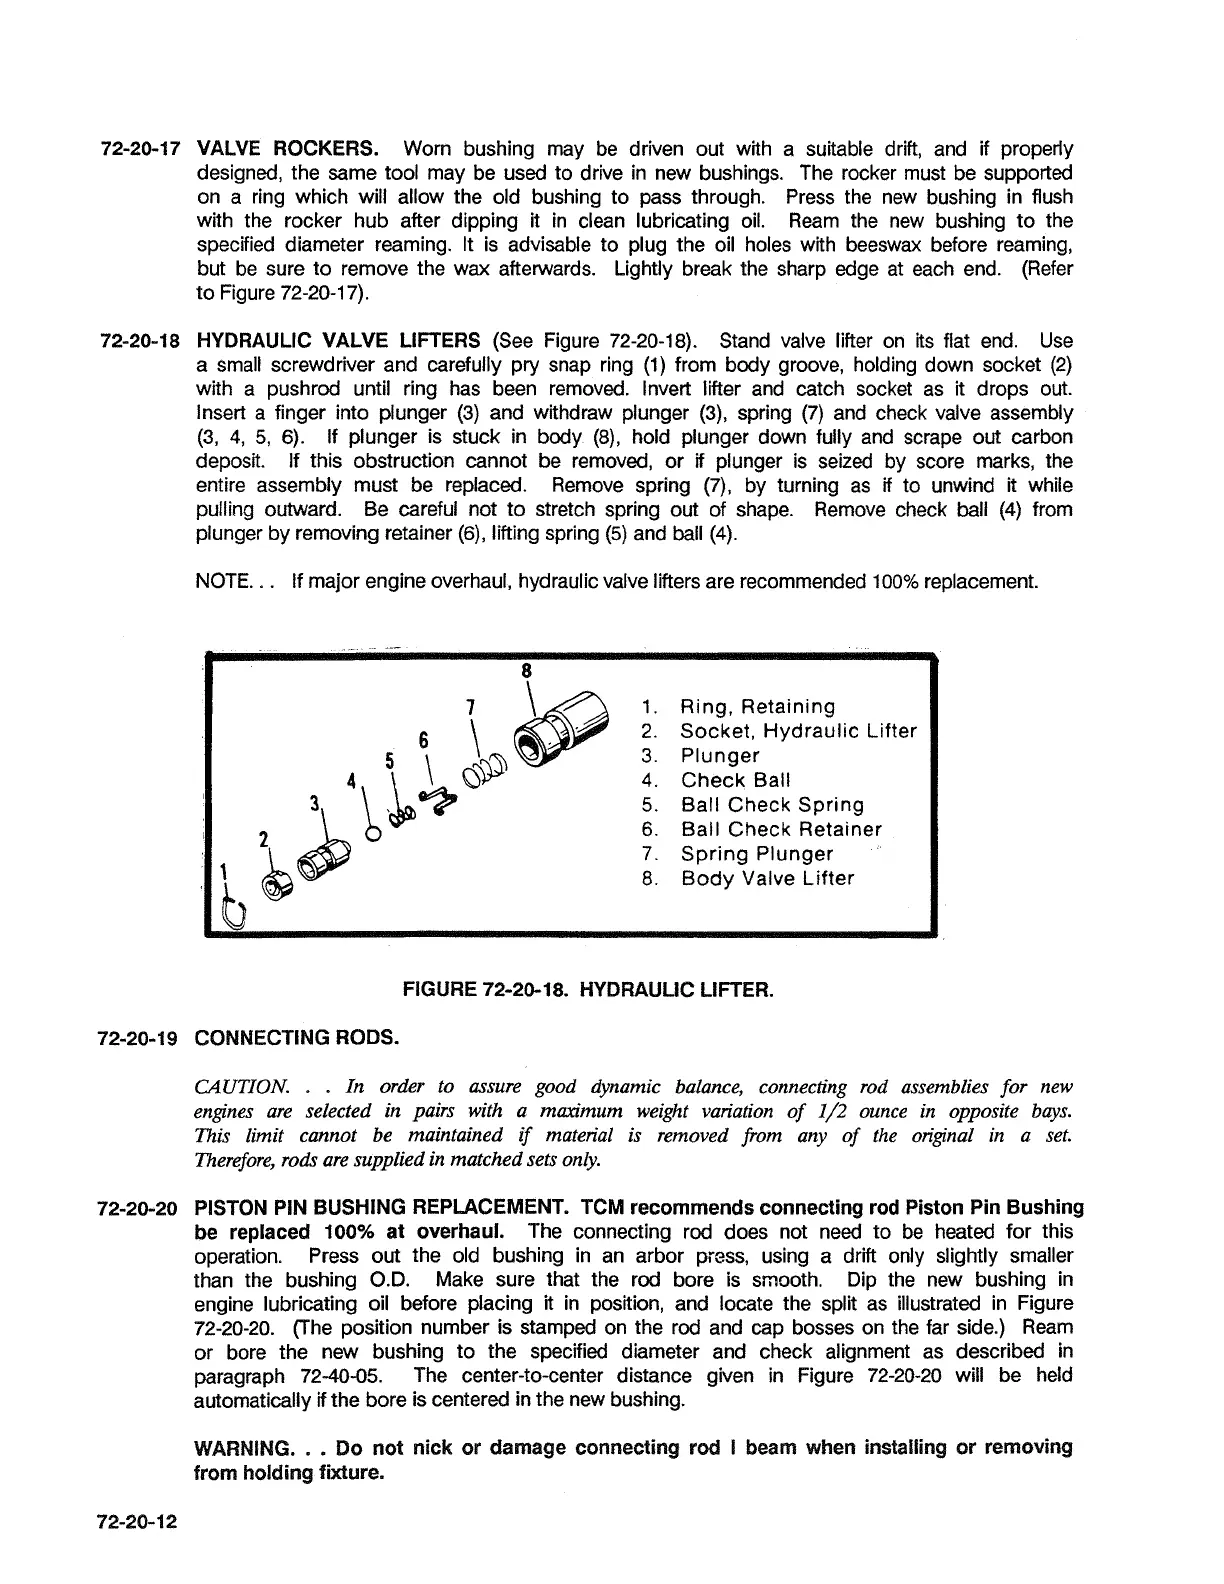
72-20-18 HYDRAULIC VALVE LIFTERS
(See Figure 72-20-18). Stand valve lifter on its flat end. Use
a small screwdriver and carefully pry snap ring (1) from body groove, holding down socket (2)
with a
pushrod until ring has been removed. Invert lifter and catch socket as
it
drops out.
Insert a finger into plunger (3) and withdraw plunger
(3), spring (7) and check valve assembly
(3,
4,
5,
6).
If plunger is stuck in body (8), hold plunger down fully and scrape out carbon
deposit. If this obstruction cannot be removed, or
if
plunger is seized by score marks, the
entire assembly must be replaced. Remove spring
(7), by turning as
if
to unwind
it
while
pulling outward. Be careful not to stretch spring out of shape. Remove check ball
(4)
from
plunger by removing retainer
(6),
lifting spring
(5)
and ball
(4).
NOTE.
. .
If major engine overhaul, hydraulic valve lifters are recommended 100% replacement.
Ring, Retaining
Socket, Hydraulic Lifter
Plunger
Check Ball
Ball Check Spring
Ball Check Retainer
Spring Plunger
Body Valve Lifter
FIGURE 72-20-1 8. HYDRAULIC LIFTER.
72-20-19 CONNECTING RODS.
CAUTION.
. .
In order to assure good dynamic balance, connecting rod assemblies for new
engines are selected in pairs with a
maximum weight variation of
1/2
ounce in opposite bays.
This
limit cannot be maintained
if
material is removed from any of the original in a set.
Therefore,
rodr are supplied in matched sets only.
72-20-20 PISTON PIN BUSHING REPLACEMENT. TCM recommends connecting rod Piston Pin Bushing
be replaced 100% at overhaul.
The connecting rod does not need to be heated for this
operation.
Press out the old bushing in an arbor press, using a drift only slightly smaller
than the bushing
O.D.
Make sure that the rod bore is smooth. Dip the new bushing in
engine lubricating oil before placing it in position, and locate the split as illustrated in Figure
72-20-20.
(The position number is stamped on the rod and cap bosses on the far side.) Ream
or bore the new bushing to the specified diameter and check alignment as described in
paragraph 72-40-05. The center-to-center distance given in Figure 72-20-20 will be held
automatically
if
the bore is centered in the new bushing.
WARNING.
.
.
Do not nick or damage connecting rod
I
beam when installing or removing
from holding fixture.
 Loading...