© 2011 Thorlabs
6 Thorlabs Beam 4.0
2
Getting Started
This section is provided for those interested in getting the Beam Profiler up and
running quickly. The more detailed description and advanced features are described
in the following sections.
2.1
Ordering Codes and Accessories
CCD Camera Beam Profiler, 190 - 350 nm*
CCD Camera Beam Profiler, 350 - 1100 nm
*Design range of Lumigen coating, sensitivity is given throughout 1100 nm but shows
increased non-uniformity and noise compared to uncoated BC106-VIS.
Wavelength range of supplied UV ND filters start at 220 nm.
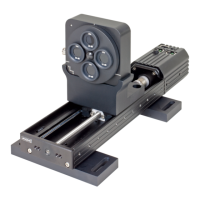
For beam quality (M²) measurement, extension sets including a translation stage and
mounting adapter for the beam profiler are available:
Length of translation stage
Please visit our homepage http://www.thorlabs.com for further information.
2.2
Unpacking
Inspect the packaging for damage. If the shipping container seems to be damaged,
keep it until you have inspected the contents and you have inspected the Camera
Beam Profiler mechanically and electrically.
Verify that you have received the following items:
1 BC106 Camera Beam Profiler instrument with mounted filter wheel
containing
o 4 Attenuation filters, see Filter Wheel
o 4 Filter caps in front of filters
1 USB 2.0 Cable A to Mini B, length 2 m
1 Distribution CD-ROM
1 BC106 Operation Manual
1 SM1BC Adapter
2.3
Preparation
1. Install the Thorlabs Beam software to your computer as described in Software
Installation .
2. Connect the camera using the supplied USB cable to the PC as described in
Connection to the PC .
3. Remove the filter caps screwed on the attenuation filters.
4. Rotate the filter wheel to set the highest loss optical ND filter (40 dB) in front of the
9
13
23