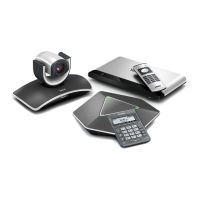
Using the VC110 Video Conferencing Endpoint
111
2. Select the desired value from the pull-down list of Auto Recording.
3. Click Confirm to accept the change.
Screenshot
You can capture the screenshot from the camera via the remote control or web user interface.
You need to insert a USB flash drive to the USB port on the VC110 all-in-one unit to store
screenshots when you are using remote control and make sure the USB feature is enabled. For
more information, please refer to USB Configuration on page 60.
You can view, delete or scale the screenshots via the remote control.
When you capture a screenshot via the web user interface, you can save the screenshots to the
computer. The stored screenshot will be saved in .jpg format and named as the captured time
and date. You can view the screenshot using an application capable of viewing .jpg pictures.
Note
The endpoint only supports USB flash drive in FAT32 format.
After the USB flash drive is inserted to the USB port on the VC110 all-in-one unit and the USB
feature is enabled, the display device will prompt "USB device available, press * to record or press
# to screenshot". The icon and used storage will appear on the status bar of the display
device. The icon will appear on the LCD screen of the video conferencing phone.
The endpoint supports capturing one screenshot per second.
 Loading...