Page 40
SYSTEM MENU
Activating the Trainer Function [Student (Slave) Transmitter]
Follow the steps below to Activate the Trainer function on the Student's transmitter.
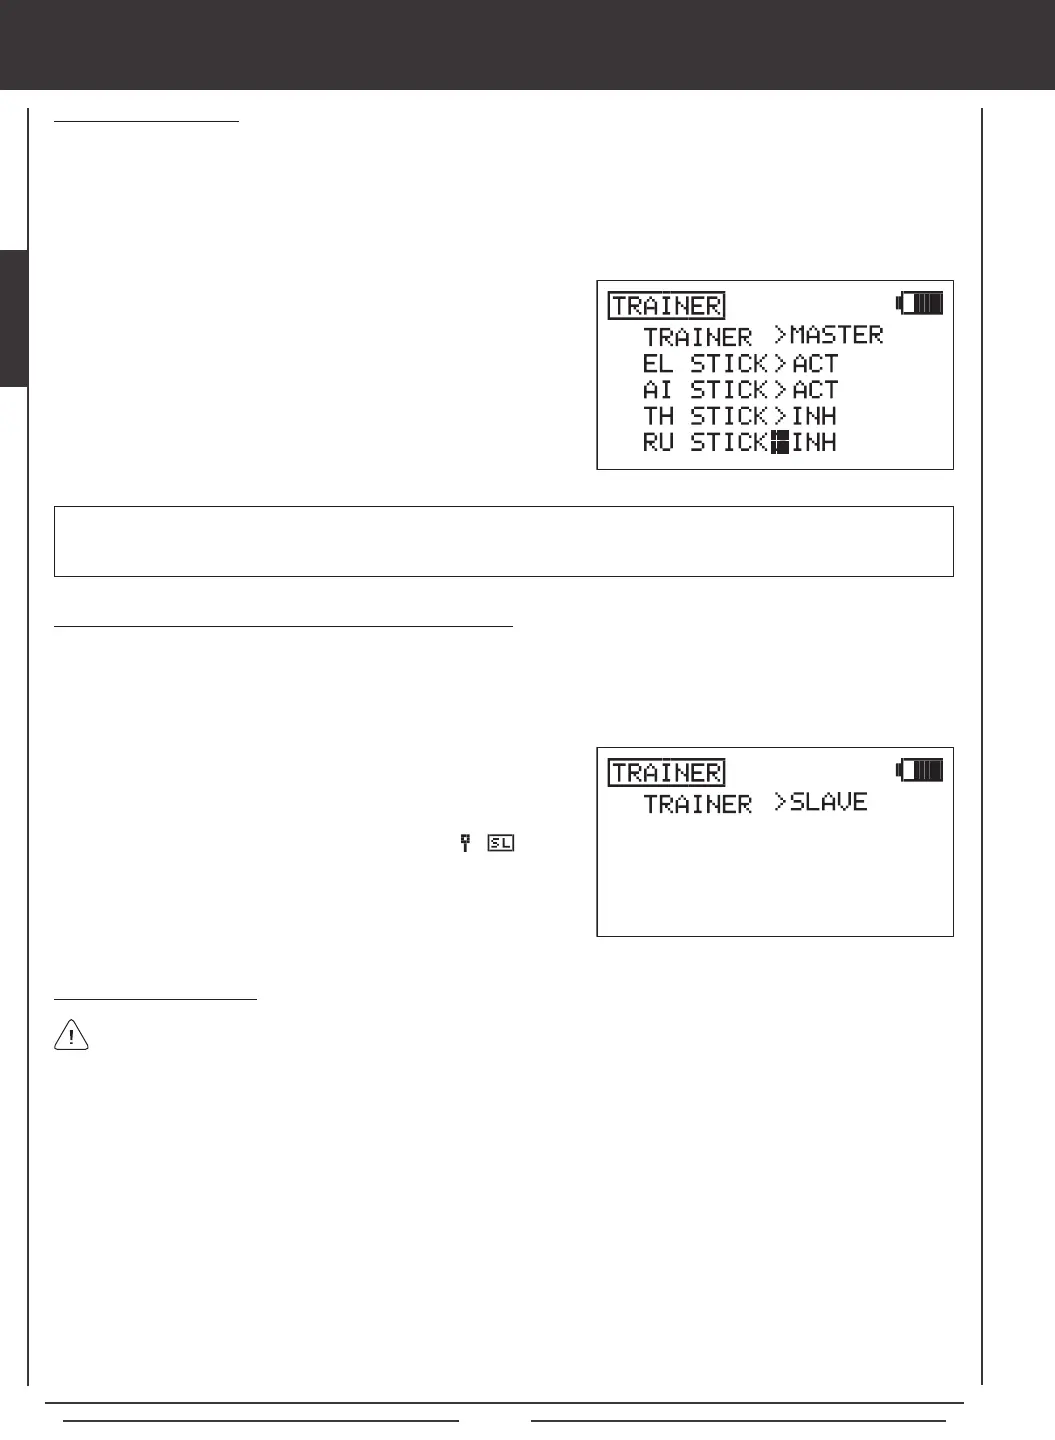
1) From within the System menu, press the Navigation Pad
56
to highlight TRAINER, then press the ENTER key to display
the TRAINER menu. The cursor will default to TRAINER>INH.
2) Press the NO/- key to change the transmitter's Trainer mode to
SLAVE. TRAINER>SLAVE will be displayed. The RED RF Indicator
will go out, the GREEN RF Indicator will blink, and will be
displayed on the Top menu, indicating that the transmitter is operating
in SLAVE mode.
Using the Trainer Function
1) The Trainer Cable should be connected between the two transmitters and the Trainer function on both transmitters should
be Activated as described previously. The Instructor's transmitter (Master) should be turned ON and the Student's transmitter
(Slave) should either be turned ON, or to save battery power, the Slave transmitter LCD Display can be turned ON, using the
DISPLAY key.
2) Turn on the model you're using for training and verify that the Instructor's transmitter controls the model's control surfaces correctly.
3) Activate the Trainer function by holding the Trainer Switch continuously and verify that the Student's transmitter controls the
model's control surfaces correctly.
4) When the Trainer Switch is released, the Instructor will have full control over the model. When the Trainer Switch is held
continuously, the Student has control over the model. As soon as the Trainer Switch is released, the Instructor will have full
control over the model once again.
In the default conguration, the Trainer function is not assigned to a switch. We strongly suggest assigning the Trainer
function to the spring-loaded switch 21, or to one of the two push-button switches 32 or 34. If you y with thumbs,
we suggest using one of the two push-button switches. This allows you to comfortably use your index nger to operate the
push-button switch. If you y with ngers, we suggest using the spring-loaded switch. This allows you to comfortably use your
middle nger to operate the spring-loaded switch. For information on assigning the Trainer function to a switch, see page 45.
1) Press the Navigation Pad
56
to highlight the control(s) you would like
to Inhibit for the Student, then press the YES/+ or NO/- keys to select
the INH option.
Inhibiting Control Sticks
When the transmitter is set to MASTER mode, the option of Activating or Inhibiting the four basic ight controls of the Student's
transmitter can be made. When a control stick is Inhibited, that specic control surface cannot be operated by the Student. This
is useful when the Instructor does not want the Student to worry about using one or more controls. For example, TH STICK and
RU STICK can be Inhibited so that the Student can focus on controlling only the elevator and aileron controls. In this scenario,
the throttle and rudder control surfaces cannot be moved by the Student, even if the Student moves the throttle or rudder control
sticks by mistake.
IMPORTANT Control sticks that are set to INH (Inhibited) can still be controlled by the Instructor's transmitter when the
Trainer function is in use. For example, if the throttle and rudder are set to INH when the Student is ying, the Student will only
be able to control the elevator and aileron controls while the Instructor will be able to control the throttle and rudder controls.
 Loading...