Page 9
tips and suggestions
l
To view our expanding library of specic transmitter setup sheets, visit the SD-10G section of our website at http://www.airtronics.net.
Available transmitter setup sheets are saved in PDF format and bundled in a .zip le.
l
When you see in the lower right corner of a page, this indicates that the current section is continued at the top of the
next page.
l
A voltage regulator is required if your receiver battery voltage output is higher than 6.0 volts.
l
An after-market peak-detection charger and/or cycler can be used to charge the Ni-MH transmitter battery, however, the
battery must rst be removed from the transmitter to be charged. The circuitry within the transmitter will interfere with the
peak-detection charger's normal operation, resulting in over-charging and damaging the battery and possibly the transmitter itself.
l
Up to 10 servos can be plugged into the receiver separately. To utilize the Channel 9/BATT or the Channel 10/BATT slots along
with a battery, you must plug a Y-Harness into the channel slot, then plug the servo into one side of the Y-Harness and the
battery switch harness into the other side of the Y-Harness.
l
It is extremely important that the receiver antenna wires be mounted as described. This will ensure that your model receives
control signals no matter what its posture, altitude, or heading.
l
All receiver channel assignments can be programmed to suit the user. For example, in the default conguration, receiver
channel slot 1 controls Elevator, however, this channel slot can be programmed to control Aileron or control Rudder, etc.
This allows the utmost control for nearly any custom conguration you may require.
l
All switches (right- and left-hand switch arrays), auxiliary levers, auxiliary push-buttons, and the Auxiliary Dial Knob can be
programmed to perform different functions depending on the user's preference. Some of these switches and buttons are
pre-programmed with specic functions based on the Model Type. For default function assignments, please see those specic
sections of this Operating Manual.
l
The radio control system is range checked using the Low Power Mode function. Do not attempt to y with the transmitter in
Low Power Mode. You will be unable to control your model once it is a certain distance away from you.
l
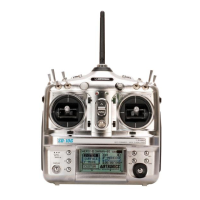
The SD-10G transmitter features a Type function which allows you to quickly set up the transmitter's low-level mixing based
on the type of model you're ying. Common templates for AERO, GLIDER, and HELI model types are provided. For example,
if your model features two aileron servos, two ap servos, and dual elevator servos, choosing these options will automatically
change the transmitter's programming to accommodate this setup. This takes the guess-work out of setting up more complex
models.
Model Type selection is used when setting up a new model and should be done prior to making any programming
changes to your model. When the Model Type selection is changed for the currently selected model, all programming
(including custom programming) for that model will be reset.
l
The SD-10G transmitter features several different safety features that will sound an audible alarm when triggered. If you turn
your SD-10G transmitter ON and it beeps, this is more than likely a safety alarm.
l
The Display Key activates the transmitter's LCD Display without actually turning the transmitter ON. This allows you to
check and/or change programming settings without actually turning the transmitter ON. To turn only the LCD Display ON,
press and hold the DISPLAY Key for ~2 seconds. To turn the LCD Display OFF, press the DISPLAY Key once.
l
The SD-10G transmitter is compatible with FHSS-3 and FHSS-1 Airtronics 2.4GHz aircraft receivers. To bind the transmitter to
an FHSS-1 receiver, the transmitter modulation must rst be changed to FH1.
l
Pressing the YES/+ key when a System menu or an F-Mode menu selection is highlighted will add that selection to the Custom
menu. Selections added to the Custom menu are denoted by a .
l
Models stored on the Memory Expansion Card (if installed), are denoted with an 'M' (i.e. M21:SANWA-04).
l
In the default conguration, the Model Select List contains 10 AERO model types and 10 HELI model types. The Model Type for
any of the 20 models in the Model Select List can be changed using the Type menu.
l
The Direct Model Select function allows you to select one of three of your most-used models from memory without going
through the Model Select menu. This makes it much quicker and easier to load the programming for your three favorite models.
Many of the Tips and Suggestions on the following pages can be found throughout this Operating Manual, however, we have
listed the most important ones here for your convenience.
GENERAL