Cleaning, maintenance and repairs
-X BAG0235.4 01.23
12.4 Removing the PTO shaft
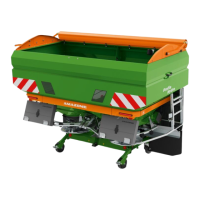
1. Move the PTO shaft guard into installation
position (Fig. 89).
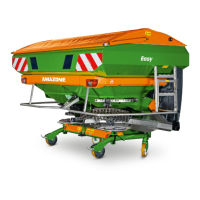
2. Remove the grease nipple (Fig. 90/1) in the
connection fork (Fig. 90/3) of the PTO shaft
(Fig. 90/2).
3. Remove the shear bolt (Fig. 90/4) between
the fork flange of the PTO shaft and the
flange of the gearbox input shaft.
4. Pry the connection fork off of the gearbox
input shaft using a flat bar.
89
90
While prying the connection forks off
of the gearbox input shaft, repeatedly
turn the PTO shaft.
12.5 Shear-off safety devices for
PTO shafts
The separately packaged screws M8 x 30 A2-
70, are replacement shear bolts (Fig. 89/1) for
fastening t
he universal joint fork of the PTO shaft
to the flange of the gearbox input shaft. Always
use grease when fastening the PTO shaft to the
gearbox input shaft.
Order number: 1362100 + DE537
12.6 Ventilate the friction clutch
After long periods of disuse and before using
it for the first time, "ventilate" the friction
clutch as follows:
1.
Remove the friction clutch from the gearbox
input shaft.
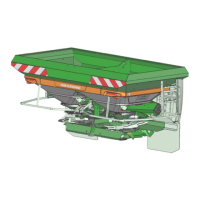
2. Relieve the springs (Fig. 91/1) by unscrew-
ing the nuts (Fig. 91/2).
3.
Crank the clutch by hand. This will eliminate
distortion caused by rust or moisture be-
tween the friction surfaces.
4. Tighten the nuts until the pressure springs
have the specified installation length of a =
1 in / 26.5 mm.
5. Push the friction clutch onto the gearbox
input shaft and fasten it in place. The fric-
tion clutch is now ready to be used again.
High humidity, large amounts of dirt or cleaning
the machine with high-pressure cleaners in-
crease the likelihood of thermal distortion of the
friction linings.
91




 To Next Page