4-2
Bosch Security Systems 09/11 BLCC500I
Solution 16i
Installation Manual Programming Overview
= A
= B
= C
= D
= E
= F
= G
= H
= I
= J
= L
= N
= O
= P
= Q
= R
= S
= T
= U
= V
= X
= Y
= Z
= 0
= 1
= 2
= 3
= 4
= 5
= 6
= 7
= 8
= 9
= SP
= #
= *
= +
= -
= =
= @
= +
= -
= [
= ]
= /
= W
= K
= M
= ,
Figure 32: Text Characters Which Can Be Displayed.
P RO GR AMM IN G BI T O PTI ON S
The ICON system includes a number programming
locations which are know as option bit locations. Each
of these has up to 8 dierent parameters which can be
selected.
To program BIT locations, enter the location number
followed by the [OK] key. The system will then display the
currently selected options in that location.
The numbers 1 to 8 are used to represent the option’s state.
For example if the number is ON then the coresponding
option is enabled, if the number is OFF then the option is
disabled.
To toggle the option state, simply press the number on
the keypad coresponding to the option.
When nished press the [OK] key to save any changes.
You should refer to the IRG or Installation manual for
detailled explanation of the various options.
-bit-
1 2 3 5 6 8
Figure 33: Sample Option Bit Menu Display
To abort programming changes, press the [MENU] key.
P RO GR AMM IN G T EX T LO CAT I ON S
Text descriptions are available for Area Name, Zone Name,
User Name, Schedule Name, Holiday Name Prox Reader
Name and Output Name. Each name can have a maximum
of 16 characters.
These names are not displayed on the keypad, however
they are used when reporting in SIA+ , SMS or Web
reporting formats. They are also stored in the history log
and and can be uploaded and downloaded to the panel
using the RAS software.
The system includes default text for all locations.
AreA 2
Figure 34: Area Text Programming Display
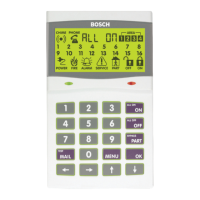
When programming text, each numeric key represents a
dierent group of characters.
Pressing the same numeric key repeatedly will step you
through the available characters assigned to the key. The
text key layout is the same as most phones. Refer to the
table below for detailed character information.
Key Characters Assigned To Each Numeric Key
1 _ - @ . 1
2 A B C 2
3 D E F 3
4 G H I 4
5 J K L 5
6 M N O 6
7 P Q R S 7
8 T U V 8
9 W X Y Z 9
0 SPACE 0
Scroll Up through entire character list
Scroll Down through entire character list
Move to left one character position
Move to right one character position
OFF Clear from cursor postiion to end of line
Table 15: Text Keypad Character Set
Once the desired character is displayed press the right
arrow key to move to the next character position.
To save programming changes, press [OK], else press
[MENU] to exit without saving. If the text string is longer
than can t on the keypad then you can use the [] and
[] to scroll left and right. Pressing the off key will clear
the rest of the line from the current cursor position.
Programming Example - Change Zone 3 Name
1) Enter Program Mode.
[1234 + MENU]
2) Select the text location to program, Zone Name
for example,
[MENU 3-1-0] + [OK]
3) When prompted and the zone number
[Zn = ] 3 + [OK]
 Loading...

