39
return, wall filler angles (at the bottom of the return walls) fit snugly and
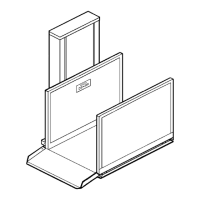
s. See Figure # 23.
Ensure that the tower
perpendicularly to the tower base support arm
VERIFY THAT THE THREADED “NUTSERTS” (INSERTS)
ARE VISIBLE AT THE OUTSIDE EDGES OF THE TOWER
)
This
4) ,
w
the tower return wall.
5) To attach panel, "C1" to panel, "B1" again, insert 1/4" (6 mm) x 1" (25 mm) bolts, flat
washers and lock washers through the holes in panel, "B1" and into the nutserts on panel,
"C1".
6) Fasten panel, "D1" to panels, "A2" and "C1", using the same procedure.
NOTE
RETURN WALLS.
Reference to panels. "B2", "C3", etc. may refer to a door, a gate or a wall panel. This does not
affect the method of assembly.
Locate and position the enclosure panel, "B1" (if equipped) to the corresponding tower 3
return wall. Note that the flush sides of all enclosure walls face towards the platform.
ensures a smooth and flush enclosure interior.
To fasten panel, "B1" to the tower return wall, insert the 1/4" (6 mm) x 1" (25 mm) bolts
flat ashers and lock washers through the holes in the panel and into the "nutserts" on
The top of the lower door on the side and back walls has locating "studs" fastened to the
aluminum. These "studs" help to position the middle or upper enclosure walls. The tops of the
upper enclosure walls are "capped" to ensure that the top of the enclosure has no open ends.
NOTE
If the enclosure is for exterior use, be sure to liberally apply silicone between the layers (A1-2)
before aligning the dowels.
7) The next level or layer of panels is identified as "B2", "C2", "D2", etc. and above that, as
"B3", "C3", "D3", etc. These panels are all mounted using the same assembly procedure,
as outlined for layer 1 ("A1, "B1", "C1" and "D1").
TRANSOM PANEL
If equipped, to fasten the transom panel (above the tower and return walls) to the enclosure’s front and
rear tower panels, insert the 1/4" (6 mm) x 1" (25 mm) bolts, lock washers and flat washers provided.
REMEMBER! THE FLUSH SIDE OF THE TRANSOM
FACES TOWARDS THE PLATFORM.