42
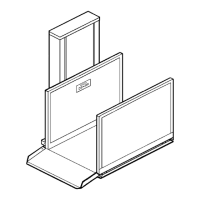
Once the enclosure is assembled and squared, use the slotted, aluminum, floor-mounting angles
provided to connect the bottom of all enclosure panels to the floor. Be sure to use enough fasteners for
both the floor and the enclosure panels. See Figure # 26.
The lower landing door is equipped with a steel-mounting channel below its sill. There are holes
provided to mount this channel to the floor inside the enclosure.
installed.
When the base of the enclosure has been fastened to the floor, the fixed ramp can be
NOTE
Ensure that the ramp lines up with the door panel, before the unit is fastened to the floor.
here are hoT les provided in the ramp to allow concealed fastening. Install plastic hole plugs, once the
mp is securely mounted.
OME (OPTIONAL)
ra
D
THE DOME IS CUMBERSOME TO HANDLE AND
SHOULD NOT BE INSTALLED IN WINDY CONDITIONS.
ALWAYS HAVE HELP TO ASSIST IN THE SAFE
INSTALLATION OF THE DOME.
1) Place the dome atop the enclosure, ensuring proper alignment with the enclosure wall's
edges. See Figure # 27.
) Inspect the dome’s position from inside the enclosure. Verify that the dome is centered.
) With the dome in its final position,
drill 1/16" (1 mm) pilot holes along each edge, as
shown in Figure # 27.
) Remove the dome and open each pilot hole in the enclosure top with a 1/8" (3 mm)
standard drill bit. Then, open the dome holes with a 3/16" (4 mm) standard drill bit.
) Use rubber gasket between the top of the enclosure and the underside of the dome.
) Liberally apply a bead of quality, clear silicone around the base of the dome.
IMPORTANT
2
3
4
5
6
This helps to maintain a leak-proof seal and allows the dome to have a flexible attachment,
reducing the possibility of cracking the dome.
7) Re-position the dome atop the enclosure, aligning pilot and drilled holes in the dome.
) Fasten the dome with #10 3/4" (19 mm) self-tapping screws provided.
8