Setup Connecting to a Computer or Network (Optional)
CubiScan 125 15
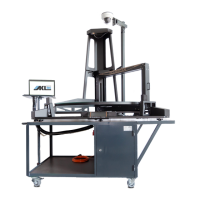
3. Turn on the CubiScan 125 with the power switch located on the left side
of the controller box.
4. Zero the CubiScan 125. For instructions, See “Zeroing the CubiScan 25”
on page 27.
The CubiScan 125 performs self-calibration and diagnostic procedures that
take about 5 seconds. Do not touch the CubiScan 125 platform during these
5 seconds.
Connecting to a Computer or Network (Optional)
To connect the CubiScan 125 to a computer, do the following.
1. Place the computer close to the CubiScan 125. (Refer to “Placement” on
page 6 for information.)
2. Locate the controller box. The controller is located just behind the
touchscreen at the front of the base.
3. Choose from one of the following operating methods.
• Connect the CubiScan 125 to a host system via a standard 10/100Base-T
Ethernet TCP/IP port. This is the recommended method and all parts
needed to connect the CubiScan 125 to a computer via an Ethernet
connection have been supplied by Quantronix. You may need to load the
driver. To load the driver onto the computer follow the instructions on
page 16. You can use Qbit software or the touchscreen options to
configure the CubiScan 125 for TCP/IP communication. Contact
Quantronix for information on available software. Or, refer to the
Communications Protocol.
• Connect the CubiScan 125 to a PC using a USB cable (not provided)
through the USB port on the controller box. You will need to load the
USB driver to use this port. Follow the instructions on page 20 to load
the driver.
• Connect the CubiScan 125 to a PC through the RS-232-C serial port on
the controller box. Use the Qbit software on the computer to run the
CubiScan 125.