You are now on the Xesar network adapter configuration page.
As shown on the illustration, complete the white fields.
Configure the fields highlighted in yellow as follows:
• The IP address defines the IP address of the Xesar network adapter.
Please note that changing this address and clicking Update (or confirming with the ENTER
key) means the network adapter can exclusively be opened and configured using this ad-
dress.
It is necessary to define up to 123 different IP addresses for each of the 123 potential Xesar
network adapters within a system.
In this process, also check the network settings of the PC and observe the valid IP address
range of your network.
• The Subnet mask defines the subnet used.
• The Device name can be individually configured and it does not influence the device func-
tion.
• The Login password (Login password) restricts access to the device configuration page. A
default password has not been configured.
• The Remote IP corresponds to the IP address of the computer running the Xesar software
and is responsible for communication between the Xesar network adapter and the Xesar
software.
Note: The Remote IP (PC) and IP address (Xesar network adapter) must differ!
Notice: Make sure you have selected Local port, Socket mode TCP Client and not
TCP Server!
Sample configuration:
IP address 192.168.100.101
Subnet mask 255.255.255.0
Device Name Adapter1
Login password passwordadapter1
Remote IP 192.168.100.1
After having completed the parameter configuration, click Update to complete the Xesar
network adapter configuration.
Resetting network adapters:
If you are forced to reset the network adapter in the event of an error, subsequently re-
check the Parameter settings.
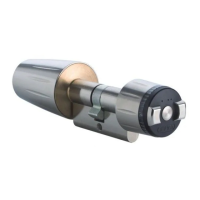
Notice: In this process, particularly check Socket mode (TCP client), Baud rate
(115200) and Port (9081)!
Figure 185: Port: