Dante Controller Software Installation
The DMP128PAT uses Dante Controller for Windows from Audinate to select and route
inputs and outputs for all connected DMP128ATs and other Dante-compatible audio
devices.
Download and install the latest version of Dante Controller for Windows from the included
software DVD or from the Dante Controller product page at www.extron.com .
Dante Network Audio Setup
The following procedure is recommended for configuring DMP128AT devices on a Dante
network. When configuring multiple DMP128AT models, follow this procedure for each
device, connecting them to the host computer one at a time.
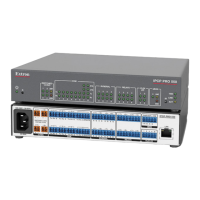
100-240V ~ 0.6A MAX
50/60 Hz
LAN
EXP
RS-232
Tx Rx G
RESET
MIC +48V
5678
1234
8
4 1
1 2345G 6
1234
78910 G
11 12 13 14 15 G1617181920G
234
56 78
910
11 127
3
6
2
5
1
MIC/LINE INPUTS
OUTPUTS
DIGITAL I/O
REMOTE AT
DMP 128 C AT
PHONELINE
k
DMP 128 C AT
ef
gh ji
Figure 66. Rear Panel, AT Switch (
k
)
NOTE: A connection to both the Dante (AT) Ethernet switch and the DMP128 LAN
port is required for this setup.
• If the control computer has only one Ethernet port, connect it to a rear panel AT
port (see figure 66,
k
). Then connect a short Ethernet cable from the LAN port
(see figure 66,
i
) to an unused AT port (see figure 66,
k
).
• Alternately use an Ethernet switch to connect the control computer to both the
LAN and AT ports.
1. Connect the control computer to an AT (Dante)
port on the DMP128. Also connect the control
computer to the DMP128 LAN port.
2. Start DSPConfigurator in Live mode (see
Selecting Live Mode and Pushing or Pulling
Data on page90).
3. From the DSP Configurator menu bar, select
Tools > Device Settings (see figure 67,
right).
Figure 67. Tools, Device Settings
DMP128 • Dante Installation and Operation 113