GFK-0356Q Chapter 3 Baseplates 3-13
3
Rack Number DIP Switch on Expansion and Remote Baseplates
Each baseplate in a Series 90-30 system is identified with a unique number called a “Rack
Number.” Rack Numbers for Expansion and Remote baseplates are selected by setting a DIP
switch located on each baseplate directly above the connector for Slot 1. Rack number 0 must
always be present and is assigned, by default, to the CPU rack (the CPU baseplate does not have
this DIP switch). Racks do not need to be contiguously numbered, although for consistency and
clarity, it is recommended that rack numbers not be skipped (use 1, 2, 3 – not 1, 3, 5). Rack
numbers must not be duplicated within a system. The following table shows the DIP switch
positions for rack number selection.
Table 3-1. Rack Number Selection Switch Settings
Rack Number
DIP Switch 1 2 3 4 5* 6* 7*
1 open
closed
open
closed
open
closed
open
2
closed
open open
closed closed
open open
3
closed closed closed
open open open open
* Rack numbers 5, 6, and 7 only valid for CPUs 350 and higher.
The particular CPU module used determines how may expansion and remote baseplates are
allowed:
■ The 331, 340, and 341 CPUs support a total of four Expansion and/or Remote racks.
■ The 350, 351, 352, 360, 363, 364, and 374 CPUs support a total of seven Expansion and/or
Remote racks.
Each baseplate has a label above the DIP switch that shows the settings for each rack number. The
following figure shows this DIP switch package with an example of rack #2 number selected.
Note
Use a ball-point pen to set the DIP switches. In general, it is best to avoid using a
pencil to set DIP switches since graphite from the pencil can damage the switch.
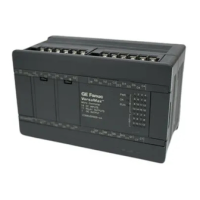
SERIES 90-30
PROGRAMMABLE
1
DIP
SW
1234
EXPANSION RACK #
X = CLOSED
GEFanuc
BASE 10-SLOT
EXPANSION
CONTROLLER
= CLOSED (Switch pushed down on right side)
X
X
X
X
X
X
X
2
3
5
X
6
X
7
Figure 3-11. Rack Number Selection Switch (Shown with Rack 2 Selected)
 Loading...