Iss. a – Translation of the original version
Doc. Ref. : SOUND2.940.001
Figure 39: Importing the configuration
12. Once the procedure is complete, remove the SD card from the slot.
13. Fit the bottom cover.
14. Tighten the 2 screws that secure the bottom cover.
15. Start up the mill.
16. Look at the SOUND2 screen to check that the noise is being received correctly.
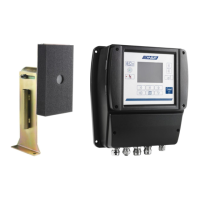
8.5.2. Changing the microphone
Equipment/consumables
− Microphone
Prerequisites/Preliminary operations
− Stop the mill.
− Switch off the SOUND2.
Removal
1. Disconnect the microphone connector from the connector (1) on the mounting bracket.
2. Remove the microphone assembly (3) from its position on the mounting bracket (2).
3. Remove the microphone assembly (3).
Figure 40: Removing the microphone
Installation
 Loading...