Page 11
TABLE OF FIGURES:
Figure 1:
Type key ..........................................................................................................................29
Figure 2: Control structure of the item C 3-Series ...................................................................................53
Figure 3: Motion profiles of the item Servo Positioning Controller C 3-Series .................................................58
Figure 4: Path program ....................................................................................................................59
Figure 5: Linear interpolation between two data values ............................................................................60
Figure 6: Schematic representation of the integrated safety technology .......................................................66
Figure 7: FBA module: front view ........................................................................................................67
Figure 8: item Servo Positioning Controller C 3-Series: installation space .....................................................70
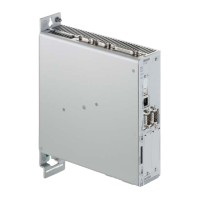
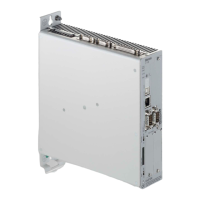
Figure 9: item Servo Positioning Controller C 3-10: front view ....................................................................71
Figure 10: item Servo Positioning Controller C 3-05: view from above ...........................................................72
Figure 11: item Servo Positioning Controller C 3-05: view from below ...........................................................72
Figure 12: item Servo Positioning Controller C 3-Series: mounting plate ........................................................73
Figure 13: Connection to the power supply and motor ...............................................................................74
Figure 14: Complete set-up of the item C 3-Series with a motor and PC .........................................................76
Figure 15: Power supply [X9] ..............................................................................................................79
Figure 16: Motor connector [X6] ..........................................................................................................81
Figure 17: Connecting a holding brake with a high current demand (> 2 A) to the device ...................................82
Figure 18: Basic circuit diagram of connector [X1] ...................................................................................84
Figure 19: Pin assignment: resolver connector [X2A] ................................................................................89
Figure 20: Pin assignment: analogue incremental encoder – option [X2B] .....................................................94
Figure 21: Pin assignment: incremental encoder with a serial interface (e.g. EnDat, HIPERFACE) – option [X2B] .....94
Figure 22: Pin assignment: digital incremental encoder - option [X2B] ...........................................................95
Figure 23: Pin assignment [X10]: incremental encoder input ......................................................................97
Figure 24: Pin assignment [X11]: incremental encoder output.....................................................................99
Figure 25: CAN bus cabling example ...................................................................................................101
Figure 26: Integrated CAN terminating resistor ......................................................................................102
Figure 27: Pin assignment RS232 null modem cable [X5] ........................................................................104
Figure 28: Pin assignment USB interface [X19], front view .......................................................................105
Figure 29: Pin assignment: SD/MMC card ............................................................................................107
Figure 30: PROFIBUS-DP interface: front view .......................................................................................154
Figure 31: PROFIBUS-DP interface: connection with external terminating resistors .........................................156
Figure 32: EtherCAT module: front view ...............................................................................................158
 Loading...