Do you have a question about the Metronics Quadra-Chek 200 and is the answer not in the manual?
Legal notices regarding document information, reproduction rights, and liability.
Lists registered trademarks of Metronics Incorporated and other product names.
General safety precautions and recommendations for operating and maintaining the system.
Overview of the guide's content, structure, and how to use it effectively.
Identifies the intended audience for the user's guide.
Outlines the topics covered in the initial chapters of the guide.
Defines terms and conventions used throughout the guide for clarity.
Explains the meaning of icons and typefaces used in the guide for information highlighting.
Covers measurement polarity, display resolution, accuracy, and system configuration.
Guides the user on how to use the chapter to learn basic QC200 operation.
Instructs users to read safety and operating instructions before use.
Essential safety precautions for operation, mounting, electrical, and maintenance.
Instructions for powering up and adjusting LCD tilt and contrast.
Selecting measurement units (mm/inch), datums, and coordinates (Polar/Cartesian).
Explains probing with crosshairs or edge detection, and selecting probe types.
Explains annotation modes and skewing the part for alignment.
Explains datums as coordinate system origin and how to establish them.
Procedures for measuring points, lines, circles, distances, and angles.
Applying tolerances to features to check against specifications.
Explains how the QC200 measures features and the general process.
Read safety instructions; understand fixturing and probing techniques.
States setup should only be performed by qualified personnel.
Turning on the unit and adjusting LCD tilt and contrast.
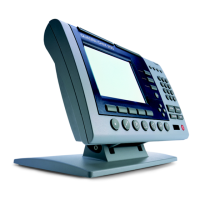
Identifies front panel keys (mode, feature, command, soft, fast, arrow, numeric) and display elements.
Details functions of Help, Feature Selection, Soft Keys, Command Keys, Fast Track Keys, Numeric Keypad, Send/Print, LCD On/Off, Menu Key.
Accessing Setup, Program, Extra, Clear, and Edge menus.
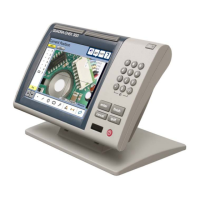
Explains DRO, Data, and Graphic screens.
Defines features and the features list.
Explains probing methods and how to select probe types.
Explains backward/forward annotation and how to select them.
Procedures for measuring points, lines, circles, distances, and angles.
Time-saving feature for automatic measurement of features.
How to change a feature type if Measure Magic misidentifies it.
How to create features not found on the part geometry.
Building new features from existing ones in the list.
Procedures for deleting individual features or the entire list.
Applying tolerances to features to check against specifications.
Guides users through recording a sample program for basic tasks.
How to test and run recorded programs, including using targeting view.
How to edit programs to change, insert, or delete steps for efficiency.
Explains how compressed steps are displayed and how to expand them.
Defines program properties and how to edit them using soft keys.
Captures QC200 settings at program recording time.
Step-by-step guide to editing a specific measurement step within a program.
How to insert missing steps (like tolerances) into an existing program.
How to remove a step from a program.
Save time by copying and editing existing programs for similar parts.
How to delete programs to conserve memory and make space.
Explains Manual and Auto edge detection and how to toggle between them.
Describes fiber-optic cables and their connections, including cautions.
Guides on connecting screen sensor and reference cables, with cautions.
Steps to check and adjust light levels for proper edge detection.
Addresses issues like screen level too high/low and reference level problems.
Calibrations required: Teach, Distance cal, Cross cal.
Perform after startup or when part/magnification changes to recognize transitions.
Fine-tunes edge detector for irregular or rounded edges.
Compensates for offset between crosshairs and edge detector, ensures accuracy.
Details QC200 rear connections (RS-232, X, Y, Q, Edge, Reference).
Step-by-step guide for connecting QC200 to PC via RS-232 cable.
Connects computer to QC200 and transfers data using RS-232 ports.
Steps to transmit data from QC200 to HyperTerminal.
Connects computer to QC200 and transfers data to spreadsheets using RS-232 ports.
Steps to transmit data from QC200 to SPC-IV.
Connects computer to QC200 and transfers data using RS-232 ports.
Steps to transmit data from QC200 to WinWedge.
Generates printed reports of inspection results.
Step-by-step guide to configure QC200 for printing reports.
Step to initiate printing of a report.
Reports contain tolerance results for toleranced features.
Step-by-step guide to configure QC200 for printing tolerance reports.
Step to initiate printing of a tolerance report.
Use ascii codes in print setup to format reports.
Connect QC200 to printer via printer or RS-232 port.
Step-by-step guide for connecting a parallel printer.
Step-by-step guide for connecting a serial printer.
Operate QC200 via computer connection using keyboard commands.
Day-to-day use doesn't require re-configuration; setup affects operation.
Enter supervisor password to access password-restricted setup fields.
Access setup screens via menu and setup soft keys; lists available setup screens.
Enter measurement resolution and display parameters.
Define encoder parameters for each axis.
Step-by-step guides for calibrating Q and Filar axes.
Assign common or repetitive tasks to hot keys to save time.
Step-by-step guide to assigning a hot key function to a key.
Format printed reports, set report width, lines per page, and other print options.
Enter pre form ascii key codes to format reports.
Establish RS-232 and parallel port settings for computer communication.
Set parameters for measurement functions like annotation and targeting zone.
Toggle sound features on/off and adjust speaker volume.
Enter supervisor password to lock/unlock programming functions.
Compensate for small machine errors between X and Y axes.
Guides through setting up Linear, Segmented Linear, and Non-linear error correction.
Define a multiplier for measurement results to compensate for shrinkage/expansion.
Adjust key delay, contrast, backlight, auto DRO counts, screen saver.
Set and format date/time information.
Discusses quantization error and repeatability issues, especially with circle measurements.
Explains LSBF, ISO, Inner, and Outer algorithms for determining feature form fit.
| Brand | Metronics |
|---|---|
| Model | Quadra-Chek 200 |
| Category | Measuring Instruments |
| Language | English |