Auto-mute (mute) groups 161
PRO6 Live Audio System
Owner’s Manual
Auto-mute (mute) groups
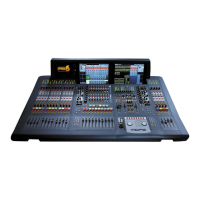
You can simultaneously mute any channels you want. This is done by assigning them
to an auto-mute group. You can have up to eight auto-mute groups, which are located
in the auto mute groups section (just above the primary navigation zone). A group is
muted by pressing its auto-mute button.
Auto-mute groups are managed via the Mute Groups screen of the GUI menu, from
where you can assign channels to any of the groups. You can configure the name and
background colour of a mute group at the Groups Sheet screen (see “Configuring the
groups” on page 164).
An auto-mute on can happen because of:
• Activating an assigned auto-mute.
• Assigning an already active auto-mute.
• Recalling a scene that assigns an already active auto-mute.
An auto-mute off can happen because of:
• Deactivating all of the assigned auto-mutes.
• Unassigning all of the active auto-mutes.
• Recalling a scene that de-assigns all of the active auto-mutes.
>> To open the Mute Groups screen
At the GUI, choose home
Control GroupsMute Groups.
1 MUTE switch, mutes/unmutes all of the
assigned channels. Also, the same channel
can be assigned to more than one auto-mute
group — the channel should be auto-muted
while any of the mute groups to which it is
assigned are muted.
2 SELECT switch, programs the auto-mute
channel assignment. Shows current
assignments to mute group and allows them to
be changed.
3 Auto-mute group name (default and
user-configured).
1
2
3