Modification mode
[12]-6
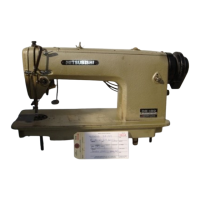
3. Confirming the modified data
* Quit the modification mode.
Press to return to the Standard
screen.
(When is pressed,
the modifications executed last will be
undone.)
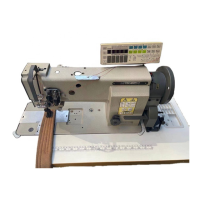
4. Confirming with the Standard screen
* The stitching start position has been
modified.
(*1)
Memo
Please note that there is a characteristic explained as follows about " Modifying the stitching
start position “ of the data with the back tacking. (There is a difference of the operation at the
case of the B data and the BA data.)
The data of the figure below is the straight line data which puts the start/end back tacking of V
mode. (A fat part is back tacking).
In this case, is sewn in order of A→B→C→D.
Therefore, the actual stitch starting position is "A point." (Starting location of the data origination
(input) is "B point."
B
[For the BA data] Please specify whether to correct the A point because work holder
automatically moves to "Actual stitch starting position (A)" when enters to "
Modifying the stitching start position “
[ For B the data ] Please specify whether to correct the B point because “ Starting location (B)
at the data input " after work holder automatically moves to "Actual stitch
starting position (A)" when enters to " Modifying the stitching start position “

 Loading...