User Guide – PERC2000 System Controller
Publication 81-9059-0605-0, Rev. B
November 2010
Proprietary Information of
PESA PESA 8-47
Once a name has been assigned to the list, click the cursor in the Panel Type field. A pull-
down box appears listing the PESA remote control panels by model number. Locate the model
number of the panel you are programming and click on the entry. The model number is placed
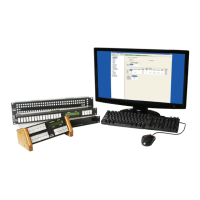
in the field and a graphic image of the panel appears at the top of the screen, Figure 8-47.
8.9.12.2 Assigning Data Functions to Configurable Panel Keys
Below the fields you just entered you will see a list field with a column labeled Key # on the
left-hand side. The numbers in the key # column correspond to the number assigned to each
key of the panel as depicted by the on-screen graphic.
On the right-hand side of the screen you will see four scroll lists for Sources, Destinations,
Levels and Categories. You can assign any key on the panel any item in any of the four lists.
Once a control panel key is assigned, when the operator presses that key its label or function is
recalled.
For example, refer to Figure 8-48 and you will see two rows of sixteen keys each (labeled 1 –
16 and 17 -32) on the left side of the panel and two groups of four numbered keys (labeled 33 –
36 and 37 – 40) on the right side. Assume you would like to program the top row to select
sources, the bottom row to select destinations and the top cluster of four buttons to each select
one of the four levels in the system.
Figure 8-48 Data Function Assignment


 To Next Page