User Manual
E727T0005, valid for E-727
BRO, 2019-06-28
Physik Instrumente (PI) GmbH & Co. KG, Auf der Roemerstrasse 1, 76228 Karlsruhe, Germany Page 52 / 240
Phone +49 721 4846-0, Fax +49 721 4846-1019, Email info@pi.ws, www.pi.ws
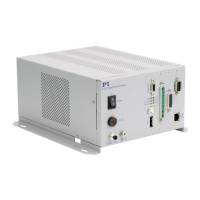
3. Install the E-727:
− Observe the general information on installation (p. 43).
− Ensure the ventilation (p. 47).
− Connect the E-727 to the protective earth conductor (p. 48).
4. Connect the following to the E-727:
− The included wide-range-input power supply to the 24 VDC connection via the
included adapter.
− The stage(s) to the socket for the piezo stages. If necessary, use the adapter or
adapter cable which was delivered with the system.
− The PC via the RS-232 interface (RS-232 panel plug) or via the USB interface (USB
type B) or via the Ethernet interface (RJ45).
5. Switch on the E-727:
a) Connect the power cord of the wide-range-input power supply to the power socket.
b) Put the Power switch of the E-727 in the ON position (|).
During the power-on/reboot sequence, the LEDs of the E-727 behave as follows:
− Phase 1: All LEDs are lit for up to 4 seconds.
− Phase 2: If the E-727 is configured to obtain the IP address for TCP/IP
communication from a DHCP server (default setting), the E-727 is searching for
the DHCP server for a maximum duration of 15 seconds. During this period, the
OFL and Servo LEDs are alternately lit, and all other LEDs are off. (If no DHCP
server is found, the static IP address set with parameter ID 0x11000600 is used.)
− Phase 3: E-727 initializes parameters. The Servo LEDs are alternately lit, and all
other LEDs are off.
The power-on/reboot sequence is finished when the Power LED is continuously lit.
6. Start PIMikroMove on the PC.
7. When the power-on/reboot sequence of the E-727 is finished, establish communication
between the E-727 and the PC in PIMikroMove via RS-232 or USB or TCP/IP. Further details see
"Communication" (p. 56).
8. In the Start up axes step in PIMikroMove, execute the AutoZero procedure for all linear axes
of the stage(s) (details see "AutoZero Procedure" (p. 62)).
Note that starting AutoZero for rotation axes will fail and cause the error code 74 („No sensor
channel or no piezo channel connected to selected axis (sensor and piezo matrix)“).
9. In the Start up controller window, click Close.
The main window of PIMikroMove opens.
10. Optionally: Configure the PIMikroMove main window.
It is recommended to see the tab cards for axes, input signal channels and output signal
channels (see figure below). You can arrange them by dragging them with the left mouse
button pressed so that they become docked e.g. to the bottom border of the window.
On the Axes tab card, amongst others you can start axis motion. The channel tab cards show
the current values of the input signal channels (sensors, analog input) and output signal
channels (output voltages for piezo actuators, analog output).