Do you have a question about the Planmeca Sovereign and is the answer not in the manual?
Lists necessary documents like wiring diagrams and user manuals for installation.
Details the operational range and spatial needs for the dental unit's articulating arms.
Specifies floor requirements, transportation, and operating environmental conditions.
Covers essential plumbing (air, water, suction) and electrical (voltage, fuses, grounding) specifications.
Defines patient area safety zones and component placement for compliance and safety.
Instructions for sealing penetrations with fire-stopping materials per national regulations.
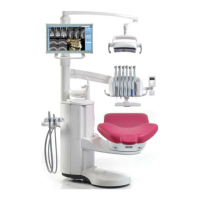
Illustrates the unit setup with an OP delivery arm and hanging tube instrument holders.
Depicts the unit setup featuring a side delivery arm configuration.
Guides the use of a support plate and template for floor tubing and cable routing.
Details securing the installation plate to the floor, preparing for cuspidor mounting.
Instructions for anchoring the cuspidor to the floor using provided hardware.
Explains how to change the cuspidor's installation position (right/left-handed).
Steps for removing transport hardware from the cuspidor assembly.
Guidance on checking and adjusting the cuspidor's vertical levelness.
Connecting air, water, suction, and drain tubes according to specifications.
Routing and connecting all necessary electrical cables within the unit.
Steps for installing and aligning the main pylon structure.
Guides the attachment of the rotating OP delivery arm to the pylon.
Details the installation of the fixed OP delivery arm onto the pylon.
Instructions for attaching the balanced arm instrument console.
Covers the installation of the HT instrument console.
Attaching protective and aesthetic covers to the OP delivery arm.
Procedures for attaching and detaching the GUI screen.
Attaching a tray to the instrument console for holding items.
Installing a rotating tray onto the HT instrument console.
Mounting the monitor arm and monitor onto the pylon structure.
Specific instructions for mounting a Planmeca white monitor to the HT console.
Guides the installation of the sterile water system to the instrument console.
Details the installation of the SingLED operating light.
Instructions for installing the Zeiss OPMI pico microscope.
Installing a bracket to accommodate extra equipment.
Steps for securely attaching the assistant element to the cuspidor.
Connecting the suction tubes to the assistant element.
How to attach instruments to the assistant element.
Securing the patient chair to the main unit's lifting adapter.
Attaching the seat bottom plate as part of the chair assembly.
Attaching headrest, backrest, legrest, and seat cushions.
Installing the armrests onto the patient chair.
Securing the bottom plate of the cuspidor.
Attaching the side and front panels of the cuspidor.
Installing the cover for the unit's base.
Attaching the footing strips to the base.
Installing the cover for the chair adapter.
Adjusting the gas spring tension for proper balance of the OP delivery arm.
Adjusting the gas spring tension for proper balance of the side delivery arm.
Adjusting the rotational friction of the assistant element and its arm.
| Brand | Planmeca |
|---|---|
| Model | Sovereign |
| Category | Dental equipment |
| Language | English |