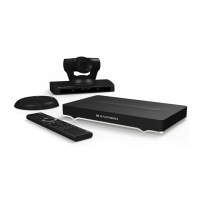
Solution
Make sure the XT Codec Unit output is properly connected to the monitor input. Make sure
the monitor/DVI cable is connected properly at both ends.
Problem
The screen layout appears to be cropped.
Solution
Configure the monitor layout as described below.
1. From the endpoint's main menu, select Configure > Quick Setup.
2. Select Next to navigate to the Configure Monitor page.
3. Follow the instructions on the screen to adjust the image.
If necessary, refer to Adjusting the Image Position on page 25 for operational
information.
Problem
The system menus or the remote presentation appears to be cropped.
Solution
Adjust the way the image appears on the monitor. To see your adjustments in real-time, we
recommend performing this procedure from the endpoint itself.
If configuring from the endpoint, you must first enable advanced configuration, as described
in Administrator Guide for Scopia XT Series.
1. Access the monitor settings as follows:
•
From the endpoint's main menu, select Configure > Advanced > I/O connections
> Monitor > Graphic Adjustments.
•
From the XT Series web interface, select Administrator settings > I/O
connections > Monitor > Graphic Adjustments.
2. Navigate to the monitor requiring adjustment (Monitor HD1 or Monitor HD2).
3. Select your preferred image view mode:
Table 15: Adjustment options for the monitor
Option Description
Adjustment Mode Select to adjust where the windows are displayed
on the monitor:
•
Menu: Select to adjust the system menus
only.
•
Menu, presentation (default): Select to
adjust both the system menu and
presentation, local or received.
Top Drag the sliders to the required sizes until the
menu or presentation borders are visible on the
monitor.
Important:
You can also adjust the image for the monitor
displaying the system menu, in the quick setup
wizard as described in Adjusting the Image
Position on page 25.
Left
Bottom
Right
4. From the web interface only, select Save.
User Guide for Scopia XT5000 Series Version 3.2 Troubleshooting the Scopia XT Series | 91