AUTO IDLE
CONFIDENTIAL
REDUCE
ENLARGE
1 : 1
ZOOM
PRINT POSITION
DENSITY
LIGHT DARK
DUO
LINE
START
STOP
AUTO IMAGE
PROCESS
TEST
PRINT
RESET
PHOTO PRINT
MASTER
MAKING
AUTO
PROCESS
SLOW FAST
CENTER
PROGRAM
MEMORY
NORMAL
NORMAL
SPEED
CUSTOM
SETTING
SCANNING
CONTRAST
MULTI-UP
PRINT
DOT
PHOTO
BOUND
ORIGINAL
DATA
PC/SCAN
32
Automatic
Printing
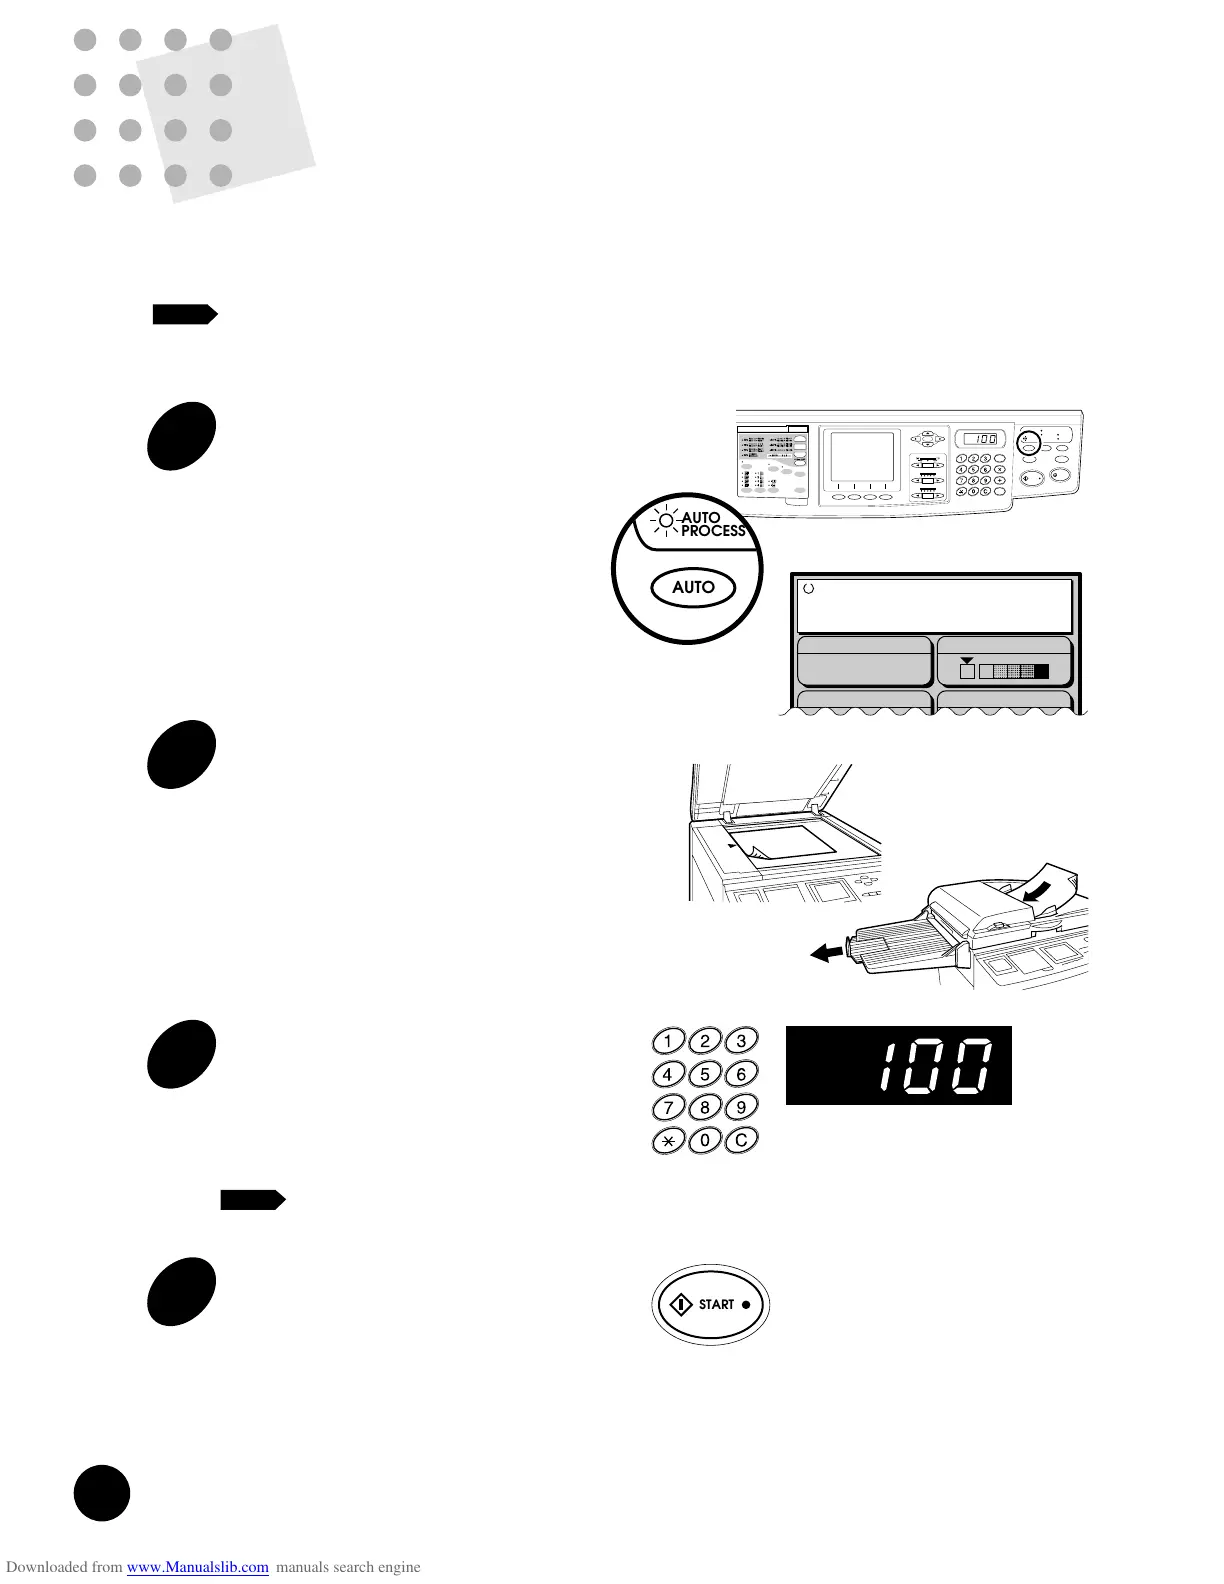
If you do not need to check print samples before making prints, press the AUTO
PROCESS key before pressing the START key to activate the Auto Process feature.
This feature enables nonstop operation from master-making through printing.
If you need to check or adjust the print position, cancel the Auto Process
feature by pressing the AUTO PROCESS key again. Or, activate the [Semi-
Auto (Master)] feature in the Custom Initial Setting window.
NOTE
1
Press the AUTO PROCESS key.
The Auto Process Indicator lights and the "Auto
Process" message appears in the Main Display.
2
Set an original into place.
Open the Stage Cover and place an original face
down on the Stage Glass. Close the cover gently
on the original.
= With the Optional ADF Unit =
Insert originals face down into the optional ADF
Unit until it stops. A maximum of 50 originals can
be placed on the optional ADF Tray at one time.
3
Enter the number of copies to be
printed.
If you enter a number incorrectly, press the C key
to reset the Print Quantity Display to "0," then
enter the correct number.
If "0" is selected as the print quantity, the
machine will not start.
4
Press the START key.
The specified number of copies are produced with
an extra proof copy.
☞ p.62 ....The Auto Process feature can be
saved in memory for quick recall.
Holding down the RESET key longer than one
second returns the Auto Process feature to the
initial setting.
☞ p.70 ....You can customize initial settings.
NOTE
Line (Auto)
Image Processing
Reproduction Size
Scanning Contrast
Paper
Ready to Make Master
Auto Process
A
29
4
Press the START key.
After an original is scanned, a master is created.
A sample is automatically printed to allow you to
check the print quality, position and density.
☞ p.39 ....To change the position of the printed
image, press the VERTICAL PRINT
POSITION Adjustment keys on the
control panel and/or turn the Horizontal
Print Position Adjustment Dial.
☞ p.41 ....To change the printing density of the
printed copies, change the print
density setting.
If settings are changed, press the TEST PRINT
key to check the results with sample prints.
5
Enter the number of copies to be
printed.
Specify the number of copies to be printed using
the Print Quantity keys; the number is displayed in
the Print Quantity Display.
If you enter a number incorrectly, press
the C key to reset the Print Quantity
Display to zero, then enter the correct
number.
NOTE
6
Press the START key.
The specified number of copies is printed.
If printing stops and the "Add Paper"
message appears in the Main Display,
paper has run out in the Paper Feed
Tray. Load paper into the tray.
7
Press the RESET Key.
After printing has finished, press the RESET Key
to restore the initial settings.
NOTE
Line (Auto)
Image Processing Scanning Contrast
Line (Auto)
Image Processing Scanning Contrast
Select Print Quantity
A
Line (Auto)
Image Processing Scanning Contrast
Printing
A
Image Processing Scanning Contrast
Ready to Print
RESET