Line (Auto)
Image Processing Scanning Contrast
Ready to Make Master
Shifting Images 2.0mm
A
39
Repositioning
the Print
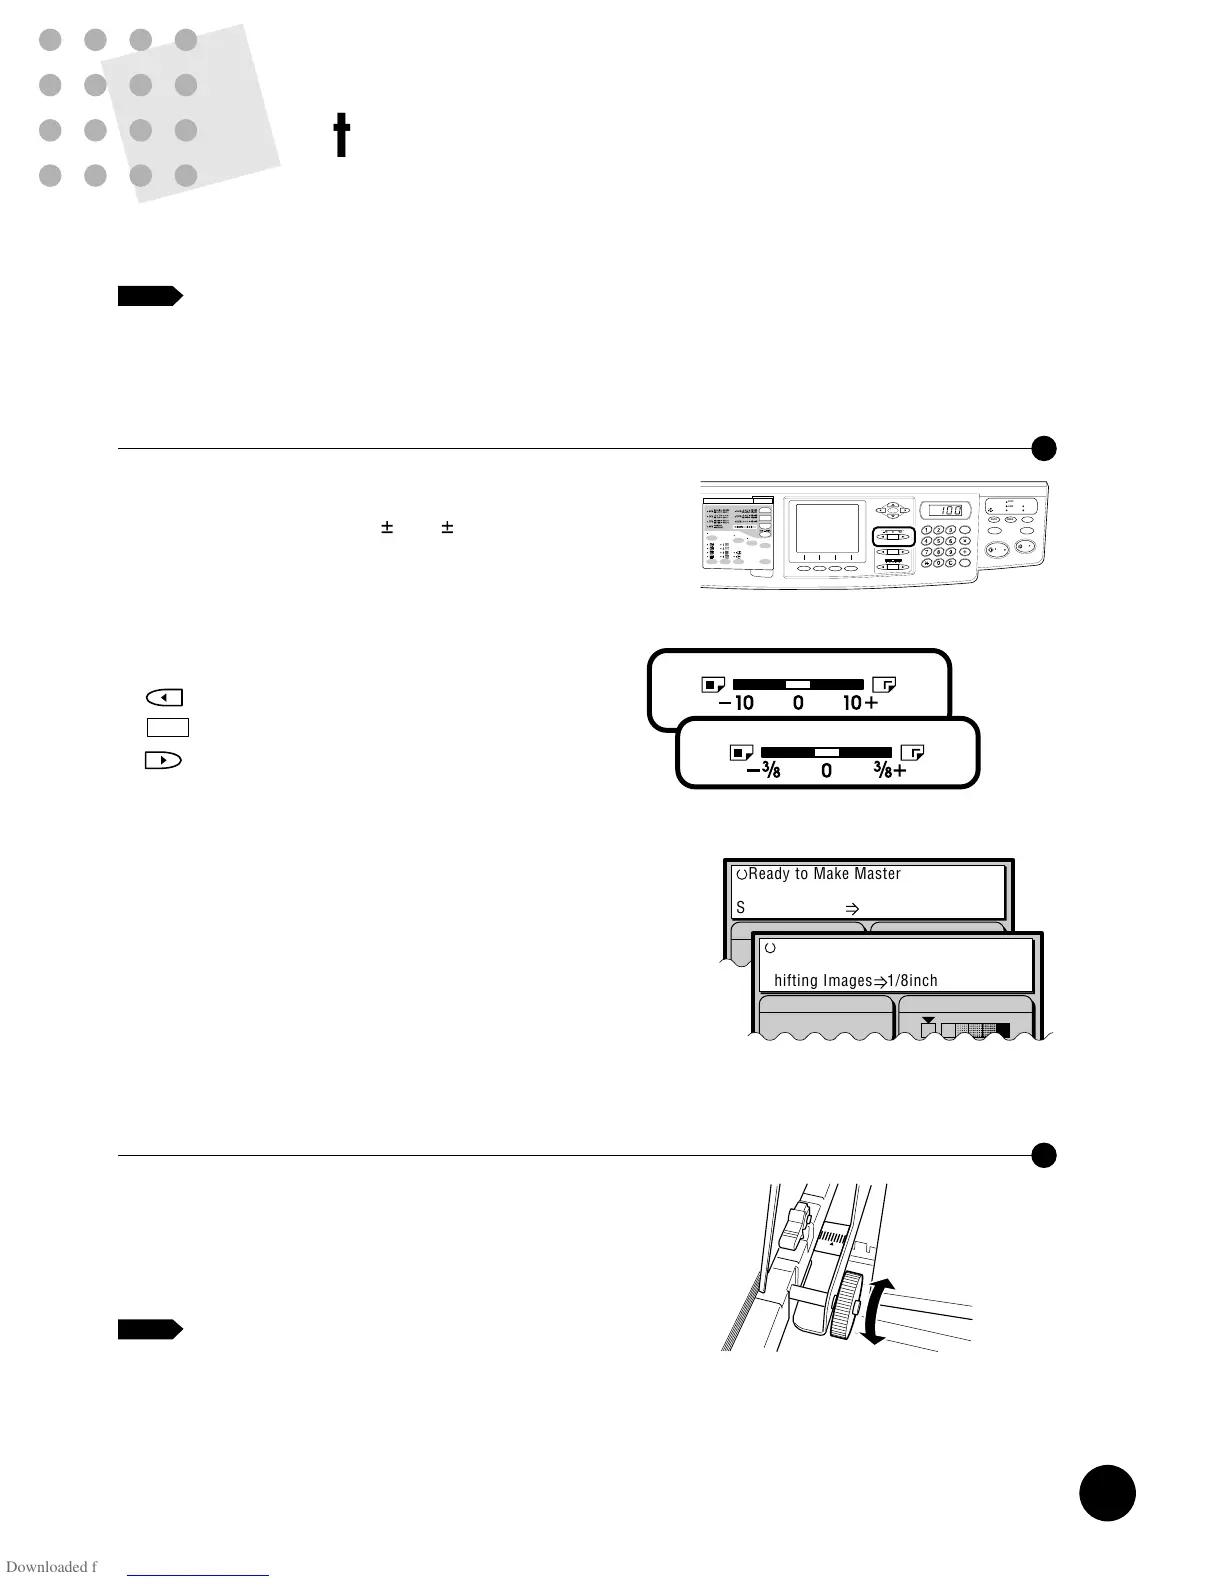
The print position can be adjusted vertically (up and down) and horizontally (to the
right and left).
If you adjust the print position, be sure to produce test prints to verify the new
print position.
NOTE
Adjusting Vertical Print Position
You can move the print position vertically by pressing
either of the VERTICAL PRINT POSITION Adjustment
keys. The allowable range is
3
/
8" ( 10mm).
When the key is pressed, the distance of print position shift
appears in the Main Display and the adjusted vertical print
position is roughly given by the VERTICAL PRINT
POSITION indicator. Produce proof prints and check the
print positions.
Moves print position down.
Returns print position to the center.
Moves print position up.
☞ p.62 ....The vertical print position can be adjusted and
saved in memory for quick recall.
AUTO IDLE
CONFIDENTIAL
REDUCE
ENLARGE
1 : 1
ZOOM
PRINT POSITION
DENSITY
LIGHT DARK
DUO
LINE
START
STOP
AUTO IMAGE
PROCESS
TEST
PRINT
RESET
PHOTO PRINT
MASTER
MAKING
AUTO
PROCESS
SLOW FAST
CENTER
PROGRAM
MEMORY
NORMAL
NORMAL
SPEED
CUSTOM
SETTING
SCANNING
CONTRAST
MULTI-UP
PRINT
DOT
PHOTO
BOUND
ORIGINAL
DATA
PC/SCAN
Adjusting Horizontal Print Position
Lower the Paper Feed Tray by pressing the Feed Tray
Descent Button, and adjust the horizontal positions by the
Horizontal Print Position Adjustment Dial. The print position
moves to the left when you turn the dial upward, and
moves to the right when you turn the dial downward.
The solid triangle s indicates the center position
of the tray. If you shift it, it is recommended to
return the Paper Feed Tray to the center position
after your print job.
Important!
When you adjusted the horizontal positions, be sure to
readjust them to the original position after printing is
finished.
[
UP
]
[
DOWN
]
NOTE
Line (Auto)
Image Processing Scanning Contrast
Ready to Make Master
Shifting Images 1/8inch
A
<RN2050/2150>
<RN2050/2150>
<RN2000/2030/2130>
<RN2000/2030/2130>
38
Reproducing Bound
Documents (Book Spine Shadow Processing)
The Bound Original feature can be used to process originals that are printed on facing
pages of a book, such as an atlas, printed report, or other types of bound originals.
When this feature is active, the binding "gutter" shadow can be erased.
• The Auto scanning contrast adjustment mode is not available for this feature.
• When the printing paper size is set to "Custom", this feature is not available.
AUTO IDLE
CONFIDENTIAL
REDUCE
ENLARGE
1 : 1
ZOOM
PRINT POSITION
DENSITY
LIGHT DARK
DUO
LINE
START
STOP
AUTO IMAGE
PROCESS
TEST
PRINT
RESET
PHOTO PRINT
MASTER
MAKING
AUTO
PROCESS
SLOW FAST
CENTER
PROGRAM
MEMORY
NORMAL
NORMAL
SPEED
CUSTOM
SETTING
SCANNING
CONTRAST
MULTI-UP
PRINT
DOT
PHOTO
BOUND
ORIGINAL
DATA
PC/SCAN
1
Press the BOUND ORIGINAL
Selection key and select either
[
Book-Wide
]
or
[
Book-Long
]
.
Book-Wide : When a book is placed as shown in
Fig.1
Book-Long : When a book is placed as shown in
Fig.2
[Fig.1] [Fig.2]
2
Select the book size.
Press the
r
function key and select the
opened book size by pressing the
w
or
q
function key.
Then press the
e
function key.
The book size is defined and you go back to the
Book Spine Shadow Processing window.
To cancel the book size selection, press
the
t
function key.
Book Spine Shadow Processing
CancelSize OK
Book-Wide
Book Size
Erasure Width
Ledger
(1.0)
(0.1)
0.5
inch
3
Specify the erasure width.
Press the cursor keys on the control panel to
specify the width of the spine shadow to be
erased.
Press the
e
function key to confirm the
specified value.
The settings of the Book spine shadow
processing is defined and you go back to the
Initial window.
To cancel the erasure width setting,
press the
t
function key.
☞ p.62 ....The selected processing can be saved
in memory for quick recall.
NOTE
NOTE
NOTE
Book Spine Shadow Processing
Cancel OK
Book-Wide
Book Size
Erasure Width
A4
(30)
(05)
15
mm
Size
Cancel OK
Book Size
Erasure Width
Ledger
(1.0)
(0.1)
0.5
inch
Size
Book Spine Shadow Processing
Cancel OK
Book-Wide
Book Size
Erasure Width
A4
(30)
( 5)
10
mm
Book Size
A3
B4
A4
B5
A5
Foolscap
Cancel OK
Book-Wide
Book Size
Erasure Width
Ledger
(1.0)
(0.1)
0.5
inch
Book Size
Ledger
Legal
Letter
Statement
<RN2000/2030/2130>
<RN2000/2030/2130>