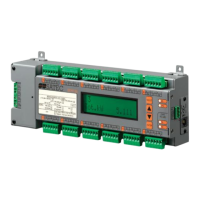
Chapter 3 BFM136 Graphical Display Operations Menu Operations
Branch Feeder Monitor 136_Installation Operation and Manual 30
3.4.4 Viewing and Changing Setup Items
A second level menu normally consists of three items: the upper-left static item indicates the menu name,
while the upper-right item represents a list of setup parameters you can scroll through, and the lower item
shows the present parameter value.
To select a parameter you want to view or change:
1. Highlight the upper-right item by briefly pressing the SELECT button if the item is not highlighted
yet.
2. Scroll through the parameter list with the UP/DOWN buttons until the desired parameter name
appears.
To change the selected parameter:
1. Press the SELECT button briefly to highlight the lower item.
2. If a number represents the parameter value, highlight a desired digit by briefly pressing the
SELECT button, then adjust the digit to the desired value by the UP and DOWN buttons.
3. If a name represents the parameter value, select the desired
value by the UP and DOWN buttons.
4. Press the ENTER button to store your selection. You return to the parameter list to select another
parameter or return to the main menu.
To exit the menu:
1. Highlight the menu name (upper-left item) by pressing briefly the SELECT button.
2. Press the ENTER button.
3.5 Menu Operations
3.5.1 Submeter Channel Assignments
This menu allows you to link the device current terminals to submeters so they can monitor them.
Additionally, the menu allows you to specify the primary current rating of the current transformers
connected to the device terminals. The number of the selected current inputs for a submeter specifies if it
will be a single-, two-, or three-phase meter.
Always select your submeters in a sequence without gaps so that your device does not occupy
unnecessary network addresses.
To enter the menu, select the SubMeter entry from the main menu, and then press the ENTER button.
To select a parameter you want to view or change:
1. Highlight the upper-right item by using the SELECT button.
2. Select the submeter you wish to configure with the UP/DOWN buttons.
3. Highlight the lower-left item by briefly pressing the SELECT button.
4. Scroll through the parameter list with the UP/DOWN buttons until the desired parameter name
appears.
To change the selected parameter:
1. Highlight the lower-right item by using the SELECT button.
2. To link a current input to a submeter, select the desired input ID with the UP/DOWN buttons.