Audio and Media Mode
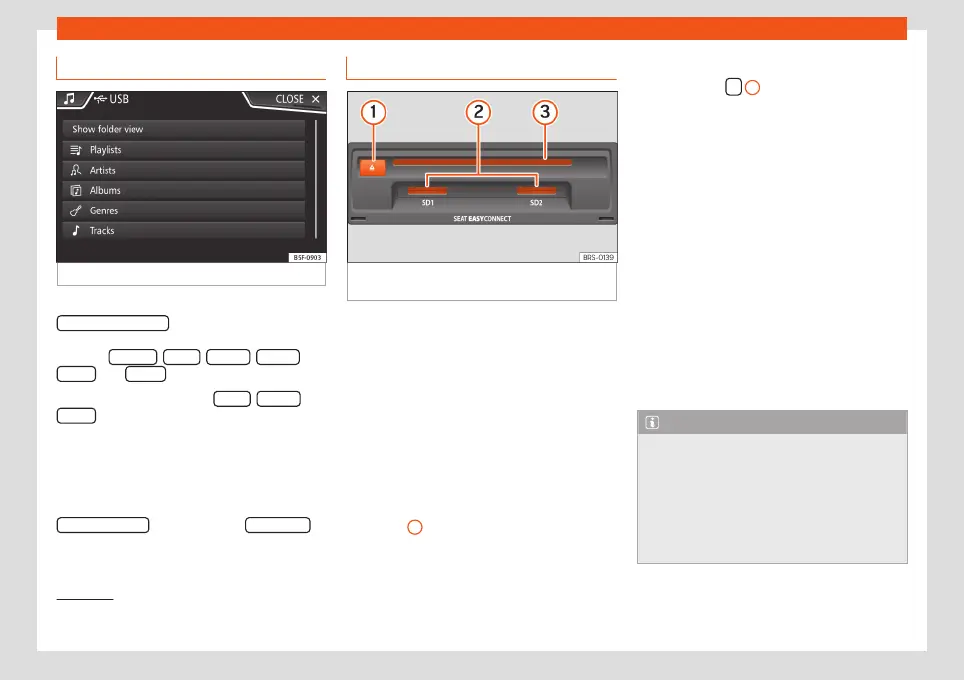
Database view
Fig. 37
Media mode: database view
From the track list, press the
Show database view
option. The content of the
current Media source will be displayed clas-
sified by Playlists , Artists , Albums , Genres ,
Tracks and Videos
›››
Fig. 35.
When selecting one of the Artists , Albums or
Tracks
folders, a search button appears in
the top right (magnifying glass) which allows
a search to be carried out in the selected cat-
egory.
›››
page 13, Input masks with on-
screen keypad.
To return to the folder view, press the
Show folder view
option from the
SELECTION
Menu.
Insert or eject a CD or DVD
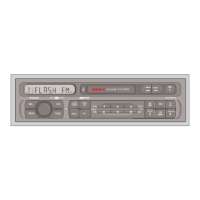
1)
Fig. 38
Slots for data storage devices in the
glove compartment.
The driver should refrain from operating the
unit while the vehicle is in motion. Insert or
change the data storage device before mov-
ing off!
The CD and DVD drive can play audio CDs
and DVDs and audio data CDs and DVDs.
Insert a CD or DVD
●
Hold the CD or DVD with the printed side
facing up.
●
Push the CD or DVD into the DVD slot
›››
Fig. 38
3
to the point where it is drawn in
automatically.
Eject a CD or DVD
●
Press button
1
.
●
The CD or DVD in the drive will be ejected
and must be removed within approximately
10 seconds.
If the CD or DVD is not removed within the 10
seconds, it is automatically retracted for se-
curity reasons without activating the CD or
DVD mode.
Unreadable or defective CD or DVD
If the data on an inserted CD or DVD cannot
be read or a faulty CD or DVD is inserted, the
corresponding warning appears on screen.
Depending on the unit, unreadable CDs or
DVDs are ejected 3 times automatically and
inserted again to initiate another three at-
tempts before said message is displayed.
Note
●
Uneven road surfaces and strong vibra-
tions can cause playback to jump.
●
When the temperature inside the unit is
too high, loading and playback of CDs and
DVDs is disabled.
●
If after inserting a number of different
CDs or DVDs and receiving the
CD drive
1)
The DVD drive is only available for the model:
“Navi System Plus”.
48