STR-DA2800ES
36
SECTION 3
TEST MODE
MEMORY CLEAR MODE
All preset contents are cleared when this mode is activated.
(Sound fi eld is also cleared)
Use this mode before returning the product to clients upon comple-
tion of repair.
Procedure:
1. While pressing the [TONE MODE] and [2CH/A.DIRECT]
buttons, press the [
?/1
] button to turn on the main power.
2. The message “CLEARING” appears and the memories are re-
set to the default values.
(This operation takes about 2 minutes)
CLEARING
3. When done, the message “CLEARED !” appears.
CLEARED !
FACTORY PRESET MODE
The specifi c preset values are set.
Procedure:
1. While pressing the [TUNING MODE] and [2CH/A.DIRECT]
buttons, press the [
?/1
] button to turn on the main power.
2. The message “FACTORY” appears and specifi c preset values
are set.
FACTORY
TUNER AM STEP CHANGE MODE
Either the 9 kHz step or 10 kHz step can be selected for the AM
channel step.
Procedure:
1. Press the [
?/1
] button to turn off the main power.
2. While pressing the [TUNING MODE] button, press the [
?/1
]
button to turn on the main power.
3. Either the message “AM 9k Step” or “AM10k Step” appears,
select the desired step.
AM 9k Step
AM10k Step
or
SOUND FIELD CLEAR MODE
The preset sound fi eld is cleared when this mode is activated.
Use this mode before returning the product to clients upon comple-
tion of repair.
(When MEMORY CLEAR MODE or SHIPMENT MODE is per-
formed, it is not necessary to perform the SOUND FIELD CLEAR
MODE)
Procedure:
1. While pressing the [MUSIC] button, press the [
?/1
] button to
turn on the main power.
2. The message “S.F. CLEAR” appears and initialization is per-
formed.
S.F. CLEAR
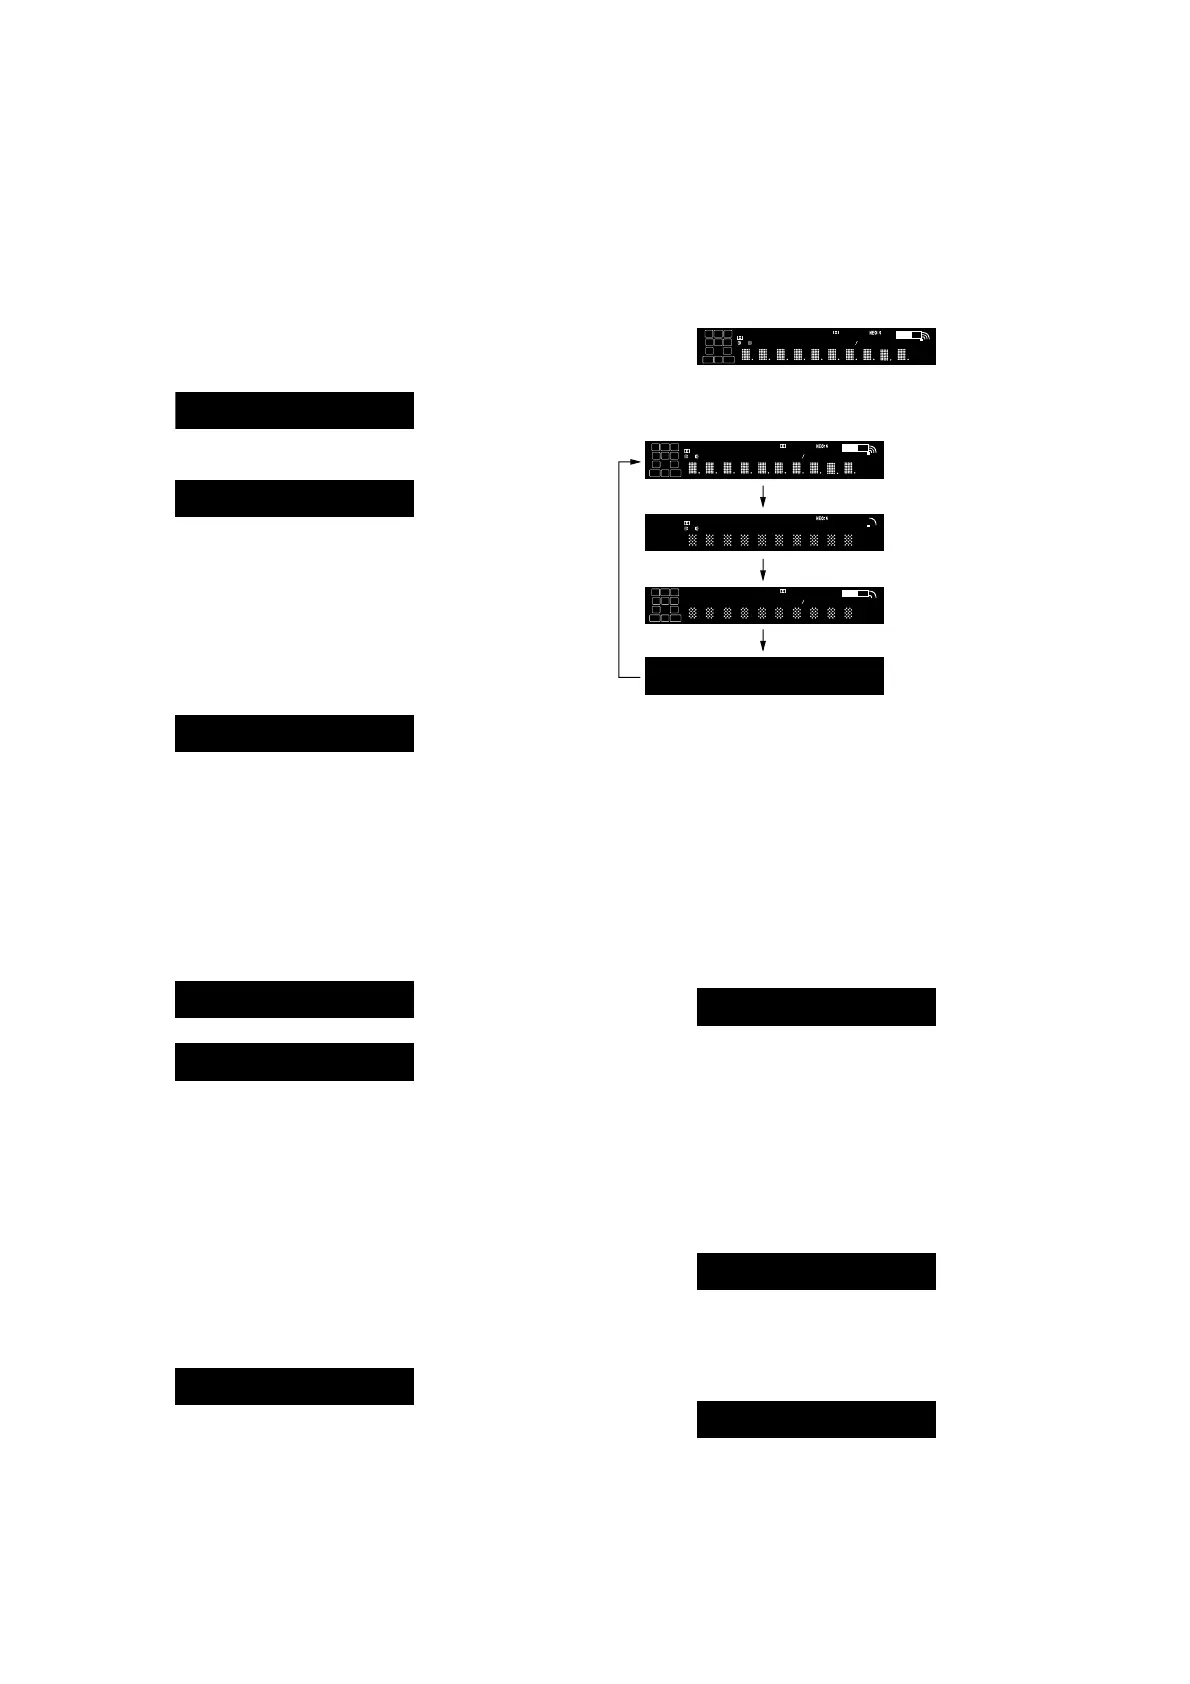
FLUORESCENT INDICATOR TUBE DISPLAY TEST
All fl uorescent segments are tested. When this test is activated, all
segments turn on at the same time, then each segment turns on one
after another.
Procedure:
1. While pressing the [TONE MODE] and [A.F.D.] buttons,
press the [
?/1
] button to turn on the main power.
2. All segments and all LEDs turn on.
LH
LFE
SW
RH
R
C
L
SB RSBSB L
SR
S
SL
ZONE 2 3 USB
ARC
HDMI COAX
OPT PARTY
PL II x z
EQ RDS
D.C.A.C.D.L.L.
S.OPT.
MEM DTS
HD
MSTR
HI RES LBR
-
-
-
UPDATE
D.RANGE
ST AAC
A.P.M.
DTS ES LPCM
SP A B
BI
BLUETOOTH
MHz
k Hz
dB m
AMP
SLEEP
96
24
D
+
EX
Tru e
HD
AB
+
HDMI OUT
3. Each time the [DISPLAY MODE] button is pressed, the screen
display is changed in order as follows.
All segments and
all LEDs turn on
Test pattern 1
Test pattern 2
All segments and
all LEDs turn off
LH
LFE
SW
RH
R
C
L
SB RSBSB L
SR
S
SL
ZONE 2 3 USB
ARC
HDMI COAX
OPT PARTY
PL II x z
EQ RDS
D.C.A .C.D.L.L.
S.OPT.
MEM DTS
HD
MSTR
HI RES LBR
-
-
-
UPDATE
D.RANGE
ST AAC
A.P.M.
DTS ES LPCM
SP A B
BI
BLUETOOTH
MHz
k Hz
dB m
AMP
SLEEP
96
24
D
+
EX
Tru e
HD
AB
+
HDMI OUT
LFE
2
ARC
HDMI
OPT
PL x
RDS
D.C.A .C.
MEM
MSTR
LBR
-
-
D.RANGE
ST ES LPCM
A
BI
k
dB
AMP
D
EX
AB
LH SW
RH
R
C
L
SB RSBSB L
SR
S
SL
ZONE 3 USB COAX
PART Y
II z
EQ
D.L.L.
S.OPT.
DTS
HD
HI RES
-
UPDATE
AAC
A.P.M.
DTS
SP B
BLUETOOTH
MHz
Hz
m
SLEEP
96
24
+
Tru e
HD
+
HDMI OUT
Releasing method:
Press the [
?/1
] button to turn off the main power.
SWAP MODE
The signal will be swap to all channel so that all speaker will have
sound output.
Procedure:
1. While pressing the [MEMORY/ENTER] and [2CH/A. DI-
RECT] buttons, press the [
?/1
] button to turn on the main
power.
2. The message “SWAP MODE” appears (No change while dis-
played).
SWAP MODE
Releasing method:
Pull out the AC power cord.
SETTING LOCK ON/OFF CHANGE MODE
All the settings can be locked.
Procedure:
1. While pressing the [SPEAKERS] and [MUSIC] buttons, press
the [
?/1
] button to turn on the main power.
2. The message “S. LOCK ON” appears.
S. LOCK ON
Releasing method:
1. While pressing the [SPEAKERS] and [MUSIC] buttons, press
the [
?/1
] button to turn on the main power.
2. The message “S. LOCK OFF” appears.
S. LOCK OFF