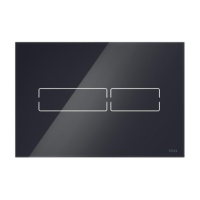
Break o the attachment rods according to the wall struc-
ture.
Screw in both actuating rods – distance to front edge of
support frame = mm.
Hook the cover of the TECEambia flush plate into the right-
hand side, and fit it onto the support frame by means of
the snap lock.
Then screw the vandal-resistant screw into the inside
of the flush plate (caution: be careful not to damage the
surface).
Installing the urinal flush plate
The first seven steps of the procedure for installing the
urinal flush plate for the U urinalflusher are the same
for all (wall-mounted) TECE urinal flush plates – see
“TECEsquare – Wall-mounted installation of the urinal actu-
ation” for more information.
Screw in the actuating rods as described above (for the
wall-mounted TECEplanus, distance to wall surface =
mm) and screw on the counter nut to prevent them from
turning.
-
Flush plates