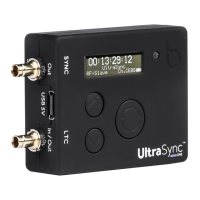
To set up your UltraSync ONE as a Master TX:
1. Connect your camera or sound mixer/recorder to your UltraSync ONE.
If you want your UltraSync ONE to provide timecode via the LTC port, connect
your device to the LTC port. Use the blue DIN 1.0/2.3 to BNC cable that is
supplied with your UltraSync ONE.
If you want your UltraSync ONE to provide timecode, genlock, or word clock
via the SYNC port, connect your device to the SYNC output port. Use the red
DIN 1.0/2.3 to BNC cable that is supplied with your UltraSync ONE.
2. Configure the device that is connected to your UltraSync ONE so that it can
receive timecode. See the device manufacturer's instructions for more
details.
3. Make sure your UltraSync ONE is switched on (see Switch UltraSync ONE On
and Off on page 11).
4. Press the Select button.
5. Set the RF Country/Area (see page 64). You only need to do this step if you
are setting up your UltraSync ONE for the first time or are using it in a
different area of the world.
6. Set the Timecode Mode to Master TX.
7. Set the RF Channel (see page 68).
The RF Channel defines which RF network your UltraSync ONE master will
create. To join this network, slave devices will need to use the same channel.
8. If you want your UltraSync ONE to output genlock, word clock, or timecode
via the SYNC port, set the appropriate SYNC O/P Mode (see Set the SYNC
Output on page 76). If you are not using the SYNC output, ignore this step.
9. Use the Set Timecode option to set the clock for your master UltraSync ONE
Set the Timecode for the Master on page 72.
10. Use the Set FPS Rate option to set the frames-per-second rate to match the
FPS of the connected device (see Set the Frame Rate Per Second on page 73).
11. Use the Local or EXT U/B option to set your UltraSync ONE to use either local
user bits or external user bits (see Set the User Bits on page 74). If you choose
local user bits, you will also need to set the user bits.
48 UltraSync ONE User Guide