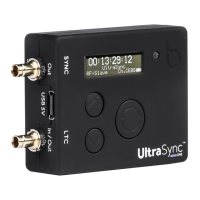
Preparation - Before you Set Up your UltraSync ONE
The 'quick set up' instructions are designed to help you get your UltraSync ONE up
and running as soon as possible. They assume that you are familiar with the master-
slave relationship, the RF network, and know how to navigate through the
UltraSync ONE menu. If you need more detailed step-by-step instructions, or extra
information about a setting, please refer to the section about that setting.
To get started:
1. Make sure you understand the various modes and network types. To learn
about these subjects, see:
l Master and Slaves (see page 24)
l Master TX (see page 33)
l RF Network (see page 29)
l RF Slave (see page 35)
l EXT LTC Input (see page 36).
When you understand the modes and relationships, you are ready to set up
your UltraSync ONE.
2. Refer to the Getting Started section for the mode you want your UltraSync
ONE to use. The Getting Started section refers you to the quick set up
instructions that relate to your intended use of your UltraSync ONE.
l Getting Started - Master TX Mode (see page 45)
l Getting Started - RF Slave Mode (see page 45)
l Getting Started - EXT LTC Input (see page 46)
Note: If you want to jam your UltraSync ONE to an external device, see
Jam UltraSync ONE to a Signal (see page 61).
44 UltraSync ONE User Guide