Procedure Description
Qty .
Use
Optional attachment (ordered
separately; refer to your authorized T oro
distributor)
1
Socket-head screw (3/8 inch)
2
W asher (3/8 inch)
2
13
Flange locknut (3/8 inch)
2
Install the attachment.
14
No parts required
–
Check the uid levels.
15
No parts required
–
Check the tire pressure.
16
CE Kit (ordered separately; refer to your
authorized T oro distributor)
1
Installing the CE Kit (for use in
CE-compliant countries).
W eight—19 kg (42 lb) [amount varies
per your model]
W eight—6 kg (15 lb) [amount varies per
your model]
W eight Bracket Kit (if necessary)
1
17
W eight—1 1 kg (25 lb) [amount varies
per your model]
Add rear weight (if necessary).
18
No parts required
–
Adjust the weight-transfer pressure (if
needed).
1
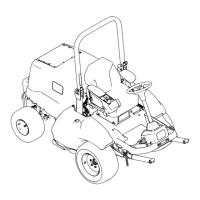
Removing the Machine from
the Shipping Container
Models 31900A, 31901A, and
31907A Only
No Parts Required
Procedure
1. Remove the screws that hold down the
rear-wheel hubs to the pallet.
2. Cut the cable tie that holds the driveshaft to the
rear wheels.
3. Remove the rear wheels from the shipping skid.
4. Raise the roll bar; refer to Raising the Roll Bar
( page 38 ) .
5. Connect a hoist to the top, center area of the roll
bar and raise the machine.
6. Remove the shipping skid from the bottom area
of the machine.
7. Position 2 jack stands under the rear area of
the machine shown in Raising the Rear of the
Machine ( page 50 ) .
8. Lower the machine on the jack stands.
2
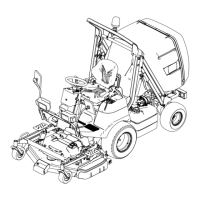
Installing the Rear T ires
Models 31900A, 31901A, and
31907A Only
Parts needed for this procedure:
2 Rear wheel
2
Small washer (2-wheel-drive only)
2
Large washer (2-wheel-drive only)
2
Bolt (5/8 x 1-1/4 inch) (2-wheel-drive only)
2
Dust cap (2-wheel-drive only)
8
Lug nut (4-wheel-drive only)
Thread-locking compound
Procedure
1. Remove the shipping bracket from the axle
spindle or wheel hub and discard the bracket.
2. Remove the tires from the shipping container
and retain the 2 bolts (5/8 x 1-1/4 inch) and large
washers that secured the tires to the container .
12