Introduction Connections Basic Setup Playback
Editing
VCR Functions Others
Function Setup
Recording
17
EN
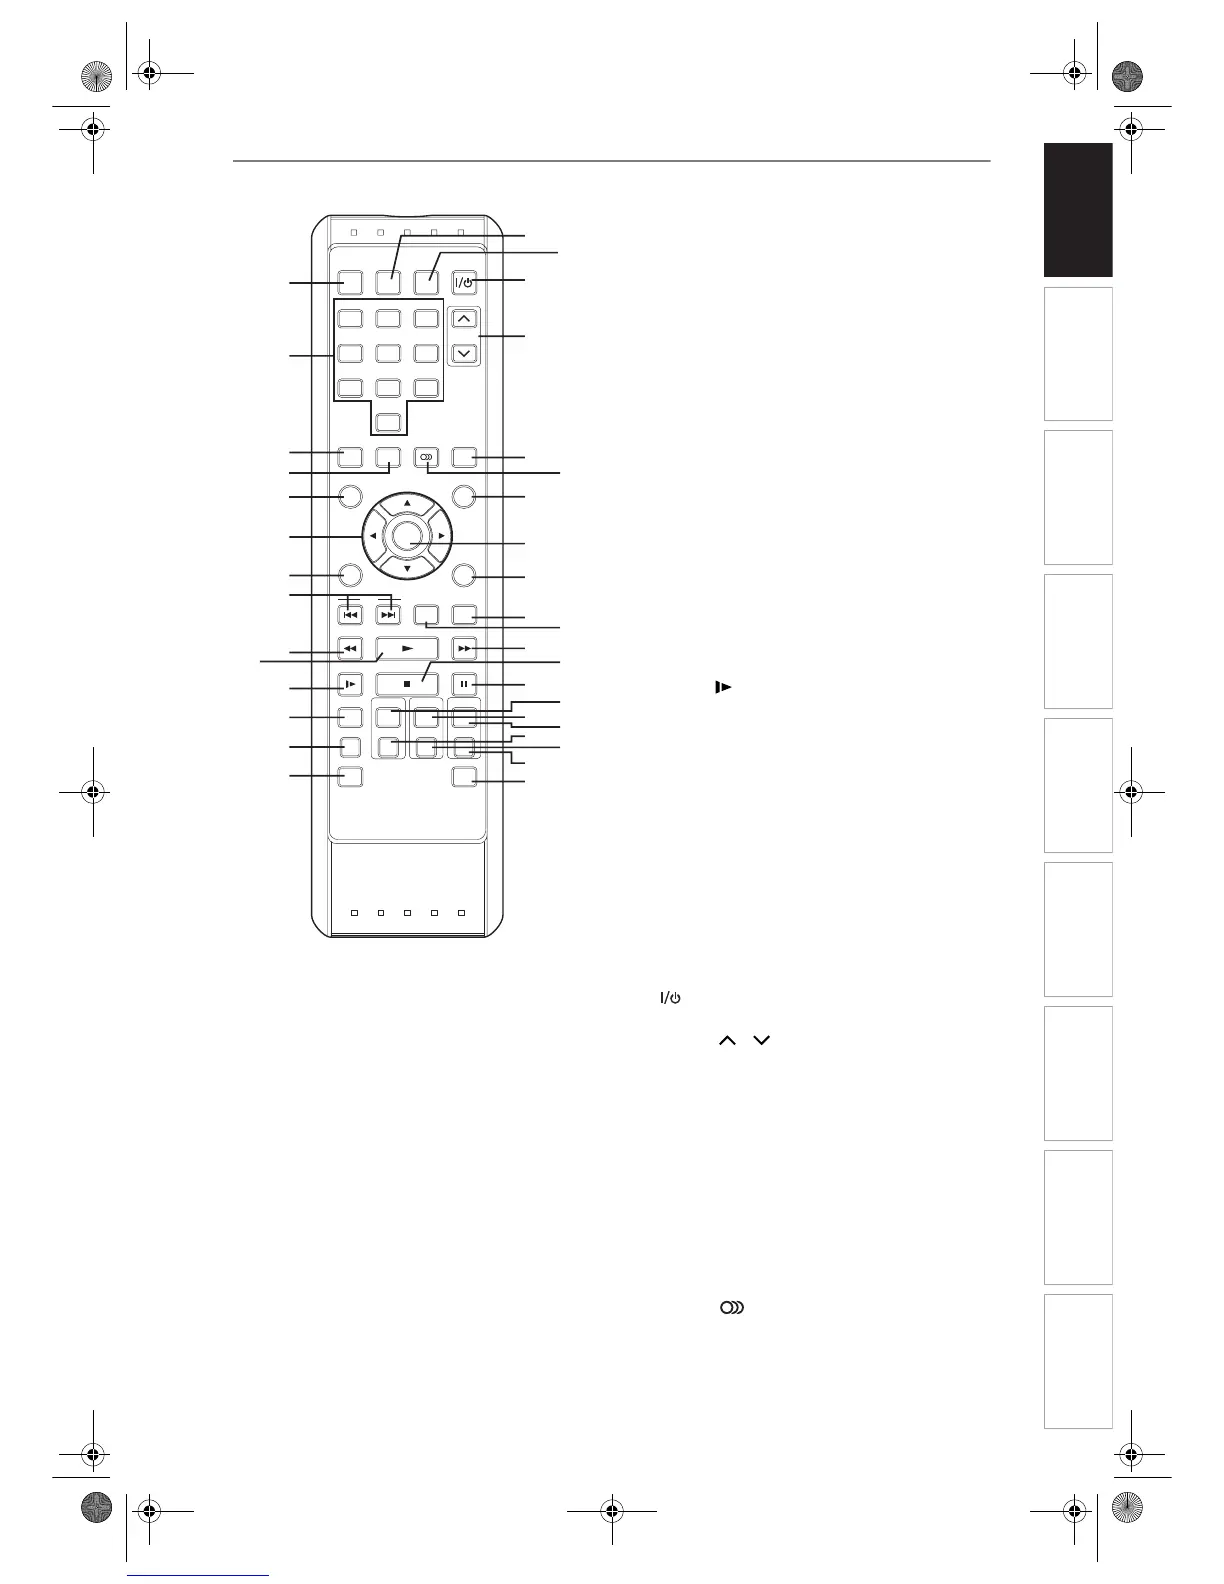
Remote Control
(
*
)
You can also turn on the unit by pressing these
buttons when the remote control is in VCR / HDD /
DVD mode.
(
**
)
This button does not function for this unit.
1 OPEN / CLOSE O button*
(DVD / VCR)
: Press to open / close the disc tray
or eject a videotape.
2 Number buttons:
Press to select channel numbers.
Press to select a title / chapter / track on the
display.
Press to enter setting values.
Press to enter the index number / desired time to
search in VCR mode.
3 SETUP button: Press to display the Setup
Menu. The unit switches to the HDD / DVD mode
when this button is pressed.
4 MENU / LIST button (HDD / DVD):
Displays the Disc Menu.
Changes the Original List and the Playlist.
5Cursor U / D / L / P buttons: Selects items
or settings.
6 DISPLAY button: Displays the on-screen
menu.
7SKIP B / F buttons (HDD / DVD):
During playback, press to skip to the previous /
next chapter or track. Or when playback is
paused, press to play back in forward / reverse
step by step.
8 REV r button:
(HDD / DVD) During playback, press to play back
in fast reverse. Or when playback is paused,
press to play back in slow reverse.
(VCR) Press to rewind the videotape or to view
the picture rapidly in reverse during the playback
mode.
9PLAY P button*:
Press to start or resume playback.
If the resume point has been set, the playback will
start from the resume point.
10 SLOW button (VCR): During playback,
press to view the videotape in slow motion.
11 REC MONITOR button (HDD / DVD):
Press to check the picture and the audio qualities
for recording.
12 REC MODE button: Press to select the Rec
Mode.
13 DUBBING MODE button: Press to display the
Dubbing Menu. The unit switches to the HDD /
DVD mode when this button is pressed.
14 TIMER PROG. button: Press to display the
Timer Programming List. The unit switches to the
HDD / DVD mode when this button is pressed.
15 INPUT SELECT button: Press to select an
external input mode (“AV1”, “AV2” or “AV3”).
16 ON / STANDBY button: Press to turn the
unit on / off.
17 PROG. / buttons:
Press to change the channel up / down.
(VCR) Press to adjust the tracking during
playback or in slow motion of the videotape. Also
while playback is in still mode, you can stabilize
the still picture.
18 CLEAR button:
(HDD / DVD) Press to clear the information once
entered, etc.
(DVD) Press to erase the track number entered in
the programme play screen for Video / Audio
CDs.
(VCR) Press to reset the tape counter.
19 AUDIO button: During playback, press to
change the audio settings.
III
O
OPEN/
CLOSE
.@/: ABC DEF
GHI JKL MNO
PROG.
123
456
PQRS TUV
SPACE
SYSTEM
SETUP
MENU/LIST
DISPLAY RETURN
SKIP
VARIABLE
REPLAY
VARIABLE
SKIP
REV FWDPLAY
SLOW
REC MONITOR
REC MODE
VCR HDD DVD
REC/OTR REC/OTR REC/OTR
DUBBING MODE
SEARCH MODE
PAU SESTOP
ENTER
TOP MENU
AUDIO CLEAR
WXYZ
78
0
9
TIMER
PROG.
INPUT
SELECT
1*
14
15
16
17
18
19
20
21
22
23
24
25
26*
27
28
29
30
32
33
34
31
2
3
**
5
6
4
7
8
9
*
10
11
12
13
E439BBD_EN.book Page 17 Wednesday, May 31, 2006 4:01 PM
 Loading...