Compare
key is pressed.
STORE
While you
are
editing the parameters, you can temporarily
hear the original sound of
the
Patch, before it was changed,
and compare it with the sound
of
the newly edited one.
The
compare function allows you to do this.
1.
Press the PATCH
A
key after changing the parame-
ters in the Edit
mode.
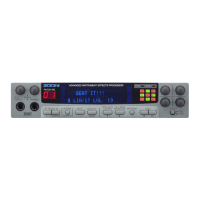
88
ADVANCED PITCH2
H+
ADVANCED PITCH2
The display changes
as
shown below and
the
all the parame-
ters of the Patch revert
to
the original settings.
Press the
STORE/EXECUTE
key
to
memorize the Patch
to
the same same Patch number in the memory. The edited
Patch is then stored
to
the same Patch number and operation
returns to the Play mode.
Helpful Hint:
You can also change the name of a Patch when you store it to
memory. See page
45
for more information.
ADVANCED PITCH2
COMPARE
2.
Press one of the EDIT /
>
keys once.
2.
Select the destination Patch number by
using
the
PATCH
VIA
keys.
Assign the Patch number by using the PATCH
V/A
keys
when storing the edited Patch
to
a
different Patch number.
(You
can
confirm the number from the PATCH
NO.
indicator.)
This returns operation to the Edit mode. The EXIT key or
UTILITY/PAGE key
can
also
be
used instead of the EDIT
c
/
>
keys.
Helpful Hint:
The compare function is convenient for checking how much
the entire sound is
affected
by editing a single parameter.
Storing
the
Edited Patch
Finishing up this Tutorial section is an explanation on storing
a Patch to memory. Any editing you have done to the
parameters so
far
is temporary and it will
be
irretrievably lost
if
you switch to editing another Patch before storing the cur-
rent one to memory. To avoid this, make the following
a
habit:
once
you've created
a
Patch you like,
IMMEDIATELY
store it to memory.
1.
Press the STORE/EXECUTE key in the
Edit
mode.
P-
P
88
ADVANCED PITCH2
H+
TubeAmp
Sound
The destination Patch name
is
indicated in the bottom line
of
the display. The edited Patch is stored to the new Patch
number and operation returns to the Play mode when you
press the
STORE/EXECUTE key. The store operation can
be
cancelled by pressing the EXIT key.
Note:
When the Patch is stored, the Patch which was previously
stored to the destination memory space is automatically
erased. Make absolutely sure that the Patch at
the destina-
tion can be erased.
This completes the
Tutorial
section.
We
trust this
has
been
helpful
as
an introduction
to
the
basic operations of the
9030.
Plcase go on to read the rest of the manual
to
get to know the
9030
better and learn more of its sophisticated and advanced
functions.