Table 7-5: Tera Term port settings
3. Remove the MVX-A16 card to be checked from the Eclipse HX-Median / Eclipse
HX-Omega / Eclipse HX-Delta matrix.
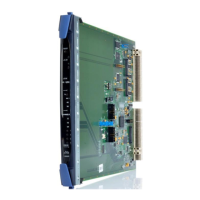
4. Connect the MVX serial cable (CAB-MVX-48Z) to the CON8 connector on the MVX-
A16 card and to the PC (see Figure 7-2: MVX-A16 MK I card: J1, CON8 and
CON12).
5. Reset (re-seat) the MVX-A16 card back in the Eclipse HX-Median / Eclipse HX-
Omega / Eclipse HX-Delta matrix.
The MVX-A16 firmware version is the first line of the information received on Tera
Term.
a. Select Firmware > Firmware report.
7.4 Upgrading the MVX-A16 MK I or MK II card FPGA
with Xilinx tools
7.4.1 Upgrading the MVX-A16 MK1
Note: Some very early MVX (MKI) cards may exhibit the following errors when
upgrading the FPGA device:
Programming failed or
The idcode read from the device does not match the idcode in the bsdl
File.
There are two possible solutions
a) USB cable speed : Adjust the USB cable speed, Output > Cable Setup
and setting the TCK Speed/Baud to 1.5Mhz
Always try this solution first for either failure mode
b) Modify the Device ID bsdl file
In the Xilinx installation directory, change the expected IDCODE from .bsd file.
To do this: